28.1K
Betaflight GPS Rescue mode is just like “Return to Dwelling” on a DJI drone. This characteristic is designed to fly your FPV drone again to its launch level and land it routinely in a failsafe or when your video feed will get sketchy. On this tutorial, I’m going to stroll you thru organising GPS Rescue Mode, testing it, and I’ll additionally share some tips about enhancing its efficiency and troubleshooting frequent points.


Among the hyperlinks on this web page are affiliate hyperlinks. I obtain a fee (at no additional value to you) in case you make a purchase order after clicking on one among these affiliate hyperlinks. This helps help the free content material for the group on this web site. Please learn our Affiliate Hyperlink Coverage for extra data.
Why GPS Rescue is a Sport-Changer
Betaflight’s default failsafe motion is dropping the quad to the bottom. Now, with the most recent GPS Rescue Mode, your drone can return near its launch level and land by itself! That is extremely helpful for long-range flights. Truthfully, I’ve misplaced depend of what number of instances GPS Rescue has saved my drones.
Learn how to Select the Finest GPS?
Listed here are the concerns when selecting a great GPS for Rescue mode:
- M10 GPS is the perfect.
- It Ought to Help UBLOX protocol, keep away from NMEA protocol because it solely helps 1Hz replace price and that’s too gradual.
- Get the largest GPS you possibly can comfortably slot in your drone – greater GPS comes with greater antenna and it’s higher for sign.
- In case your GPS doesn’t reliably offer you greater than 10 satellites outside, it’s dangerous to make use of.
GPS Suggestions
See my GPS testing right here: https://oscarliang.com/gps-review/
Prime Performer: GEPRC M1025Q
Prime Performer: HGLRC M100 5883
Smallest Value Having: GOKU GM10 Nano V3
Smallest Value Having: FlyFishRC M10 Mini
Smallest Value Having: HGLRC M100 Mini
Choosing a smaller GPS module helps save weight, nevertheless it does imply you’ll sacrifice a little bit of sensitivity that comes with fashions with a big antenna.
Technology of GPS Chip
Most GPS modules for FPV drones use both an M8, M9 or M10 chip. M10 chips are the latest and provide the perfect efficiency, able to connecting concurrently to 4 International GNSS techniques (GPS, Galileo, Glonass, and Beidou). This leads to quicker lock-ons and connections to extra satellites. Regardless of their superior efficiency, the value of M10 GPS is just like M8, making them an economical improve.
Antenna Scratches
Seen scratches in your GPS antenna’s metallic patch? Don’t fear; this isn’t essentially an indication of defect or harm. It’s usually the results of manufacturing unit tuning to make sure optimum frequency. These kinds of antenna have a nominal tuned frequency, however are sometimes impacted by development, parts location and soldering. Putting small nicks within the centre of the lengthy edges, or corners, can advantageous tune its frequency.
Is a Barometer Wanted?
A barometer measures altitude utilizing air stress, and whereas many flight controllers include one built-in, e.g. the BMP280 (such because the Speedybee F405 V4 and RushFPV F722 V2). Barometer isn’t needed for Rescue mode, however it might probably enhance altitude estimations accuracy, leads to higher altitude management and extra dependable landings. Simply bear in mind, in case you’re making use of conformal coating for water resistance, keep away from coating the barometer.
Some GPS modules provide a built-in barometer for an additional value. In case your flight controller doesn’t have one, including a module with a barometer may very well be useful.
Is a Compass Needed?
A compass (as referred to as magnetometer in Betaflight) is for figuring out instructions.
Some GPS modules provide built-in compass, which may be related to the FC by way of the i2c port (SCL and SDA). Nevertheless, Betaflight Rescue Mode doesn’t require a compass to work, it might probably work out its route from GPS information.
In truth, an improperly calibrated compass would possibly trigger extra points than it solves. In my checks, Rescue mode labored completely advantageous and not using a compass.
Learn how to inform if a GPS module has built-in compass? If it has 6 wires or solder pads, it means it has a compass – 5V and GND for energy, TX and RX is for the GPS, and SCL and SDA (i2c port) are for the compass. If it doesn’t have a compass, then there ought to solely be 4 wires/pads – 5V, GND, TX and RX.
Connecting GPS to Flight Controller
Wiring a GPS module to the flight controller is sort of simple. Merely join it on to any obtainable UART on the FC, (TX to RX, RX to TX), and energy it with 5V.
- GPS RX – FC TX
- GPS TX – FC RX
- GPS 5V – FC 5V
- GPS GND – FC GND
- GPS SDA – FC SDA (if GPS has a compass/barometer)
- GPS SCL – FC SCL (if GPS has a compass/barometer)
Keep away from utilizing Softserial to your GPS connection, because it’s restricted to a 19200 baud price. At 9600 baud, GPS reliability for Rescue Mode is compromised. A {hardware} serial port is your only option for a secure and dependable connection.

Some flight controllers, just like the Speedybee F405, characteristic 4V5 pads. These are primarily the identical as 5V pads however have the additional benefit of drawing energy from USB. That is notably helpful for these instances when the GPS is taking some time looking for satellites. Through the use of the USB for energy, you keep away from the chance of your VTX overheating whereas ready on the bottom with a LiPo battery plugged in. It additionally helps the GPS lock quicker for the reason that VTX isn’t transmitting and inflicting interference. Word that some FCs would possibly provide 5V pads powered by USB however below totally different labels; examine with a multimeter if uncertain.
Learn how to Setup GPS in Betaflight
GPS Rescue mode in Betaflight is repeatedly evolving, so it’s essential to make use of the most recent firmware model for brand spanking new options and bug fixes. I like to recommend upgrading to Betaflight v4.5 for this course of: https://oscarliang.com/betaflight-4-5/
First, within the Configuration tab of the Betaflight Configurator, activate GPS for navigation and telemetry below the Different Options part. If GPS all the time deactivates after a reboot, it may be on account of not choosing GPS within the Cloud Construct choices throughout firmware flashing.

Subsequent, within the Ports tab, assign GPS to the suitable UART below “Sensor Enter.” Betaflight helps varied baud charges: 9600, 19200, 38400, 57600, 115200. In case you are uncertain what baudrate your GPS module helps, choosing AUTO normally works.
The beneficial baud price for 10Hz GPS information price is 38400 or 57600. There may be little to be gained by utilizing 115200 with 10hz, however utilizing decrease baud charges cut back the CPU load and are extra proof against electrical noise.
| GPS Knowledge Charge | Baud Charge | CPU Load | Feedback |
| 20Hz | 115200 | Highest | M10 solely; take a look at rigorously! |
| 10Hz | 38400 or greater | Medium | 10Hz and 57600 is beneficial for GPS Rescue |
| 5Hz | 19200 or greater | Medium | Okay settings for normal use |
| 1Hz-2Hz | 9600 or greater | Least | Too gradual for clean GPS rescue, OK for easy place/velocity data |

Within the GPS tab, do the next:
- Choose UBLOX because the Protocol, which is the usual for many GPS.
- Allow Auto Config.
- Allow Use Galileo – it improves positioning accuracy.
- Allow Set Dwelling Level As soon as to stop resetting the house location with every arm/disarm cycle till you unplug the battery.
- Select Auto-detect for Floor Help Sort to boost positioning accuracy.
- Save and Reboot.

After organising, the GPS indicator on the high of the configurator ought to mild up, indicating communication with the FC. A pink icon means GPS is speaking to the FC however and not using a lock, and a yellow icon signifies a profitable GPS lock.
If the GPS indicator stays off, examine for
- GPS isn’t powered? Strive plugging in battery?
- Incorrect parameters, as an illustration, flawed baud price or protocol.
- Incorrect wiring, attempt swapping TX and RX.
![]()
Learn how to examine if GPS is working?
Questioning in case your GPS module is speaking to the flight controller? The ‘gpspassthrough’ command within the CLI can reveal any ongoing information trade. Seeing a stream of binary information means communication is occurring.
Run the ‘gpspassthrough‘ command within the CLI can reveal any ongoing information trade between the FC and GPS.
Seeing a stream of hieroglyphic binary information characters means communication is occurring. In the event you see nothing, there could also be a problem with energy, UART connection, or your setup.

Ready for GPS Lock
Getting a GPS lock, or “3D repair,” requires locking onto not less than 4 satellites and might take a couple of minutes.
Whenever you energy up the GPS module for the primary time in a brand new location, it all the time takes longer to seek for satellites, referred to as a “chilly begin”. Subsequent begins are typically faster because the module remembers satellite tv for pc positions (for instance while you change battery).
It’s more durable to get a lock indoor. If you must take a look at this inside the home, attempt to get near the home windows with the antenna pointing to the sky.
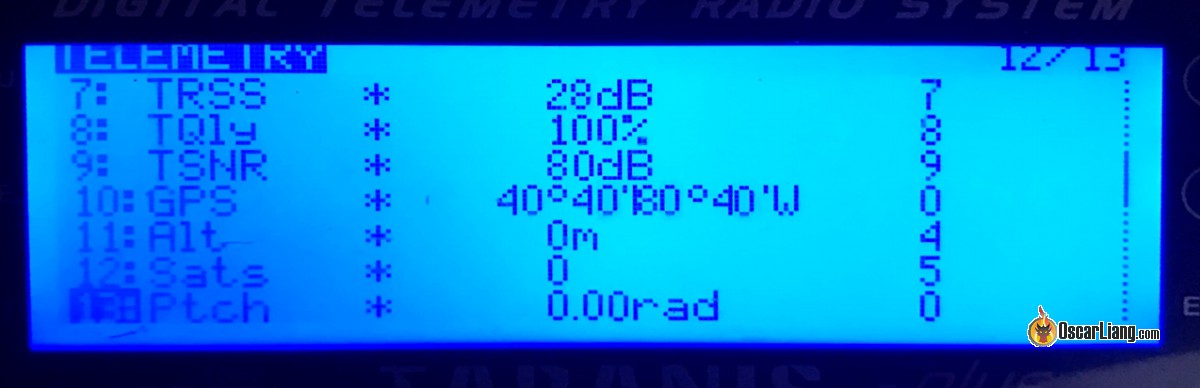
You will note GPS associated data below the GPS tab, the place it exhibits the standing of your lock, your GPS coordinates and site on a map, verifying the accuracy of your GPS lock.

LED Indicators
On most GPS such because the BN220, BN180 and BN880, there are two LED indicators, labelled “TX” (normally blue) and “PPS” (normally pink).
Flashing blue (TX) signifies UART connection. Whether it is off, then the GPS isn’t sending information out. That is additionally an indicator of the refresh price, in 1Hz it ought to flash as soon as per second, whereas in 5Hz it’ll flash 5 instances a second.
Flashing pink (PPS) signifies the 2D/3D repair standing of the GPS. If “PPS” is off you then don’t have a repair but.
When it will get a 3D repair, the pink LED on the BN-220 module ought to blink (along with the blue LED).

OSD
You may show GPS data within the OSD. Try this tutorial about Betaflight OSD in case you are not conversant in it. You may show GPS coordinates, distance and route to residence and extra.

To know what number of satellite tv for pc have been acquired, place the gps sats aspect in your OSD. 6-8 is the minimal for rescue mode to work, the extra the higher. Your GPS coordinates can even get extra correct while you purchase extra satellites.

You can too show HDOP subsequent to the variety of satellites. HDOP is a measurement of the well being of the GPS locks. A HDOP worth of 1 or beneath is good, which might offer you an accuracy of about 2.5 meters or much less. It may be oversimplying, however simply consider it as how a lot the drone could be drifting horizontally in meters.
To do that, go to the CLI, and enter:
set osd_gps_sats_show_hdop = on
save
Radio Telemetry
After getting GPS setup and bought a lock, go to the radio’s telemetry web page, choose “Uncover new sensors”. Some GPS associated new sensors ought to seem together with GPS coordinates. This solely works in case your radio system helps Telemetry – akin to ExpressLRS and Crossfire.
This lets you log GPS coordinates in your radio, it permits you to hold observe of the final recognized place of your plane. This may be useful for looking for the misplaced quadcopter in case you can’t see the coordinates in your DVR.
Testing Angle Mode
Betaflight’s GPS Rescue mode depends on Angle mode (a self-leveling flight mode) to stabilize the drone. Due to this fact, it’s important to make sure Angle mode is functioning appropriately.
First, confirm that the Accelerometer is enabled within the Configuration tab.

Subsequent, proceed to the Setup tab and calibrate the Accelerometer on a degree floor. Failure to take action would possibly consequence within the drone drifting whereas in Angle mode.

To check Angle mode, attempt hovering the drone to see if it’s self-levelling as anticipated. Keep in mind, Angle mode makes use of solely the Accelerometer and Gyro, so it gained’t hold the drone completely stationary like a DJI drone would. A slight drift on account of weight distribution and wind is regular, so long as the drone stays secure. If drifting is noticeable, you possibly can trim the accelerometer within the Configuration tab to attenuate it utilizing stick instructions on the bottom (however unlikely to utterly remove it so don’t fear).
Additionally, pay attention to the throttle place throughout hover (with a half discharged battery). This worth can be helpful when organising Rescue mode later.
Disabling Magnetometer
As beneficial by Betaflight Builders, until you might be completely certain that your Magnetometer (aka compass) has been correctly calibrated and is working appropriately, in any other case it is best to disable it (within the Configuration tab, below Accelerometer and Barometer). Betaflight Rescue Mode doesn’t rely on Magnetometer so it’s advantageous to disable it.

To examine in case your magnetometer is working, examine the compass worth in your cellphone (set to indicate True North, not Magnetic North), with the heading on Configurator’s major opening display, the GPS tab in Configurator, or the Sensors tab debug line 5 in debug mode GPS_RESCUE_HEADING, and examine that each are inside 10 levels of one another. If the heading all the time begins at North, and follows quick actions rapidly however then jumps to another worth, the Magazine isn’t proper.
Keep away from Utilizing 8K/8K
As per builders suggestions, keep away from 8K PID Loop Frequency, use 4K or decrease. That is as a result of CPU intensive nature of Rescue Mode, particularly with excessive baud price akin to 56700 or greater. Decreasing PID looptime will depart extra CPU headroom for Rescue mode to work extra reliably.
Enabling GPS Rescue Mode in Failsafe
Navigate to the Failsafe tab within the Betaflight Configurator. In the event you can’t discover this tab, be sure you’ve enabled the “Professional Mode” choice on the high of the display (subsequent to the Replace Firmware button).
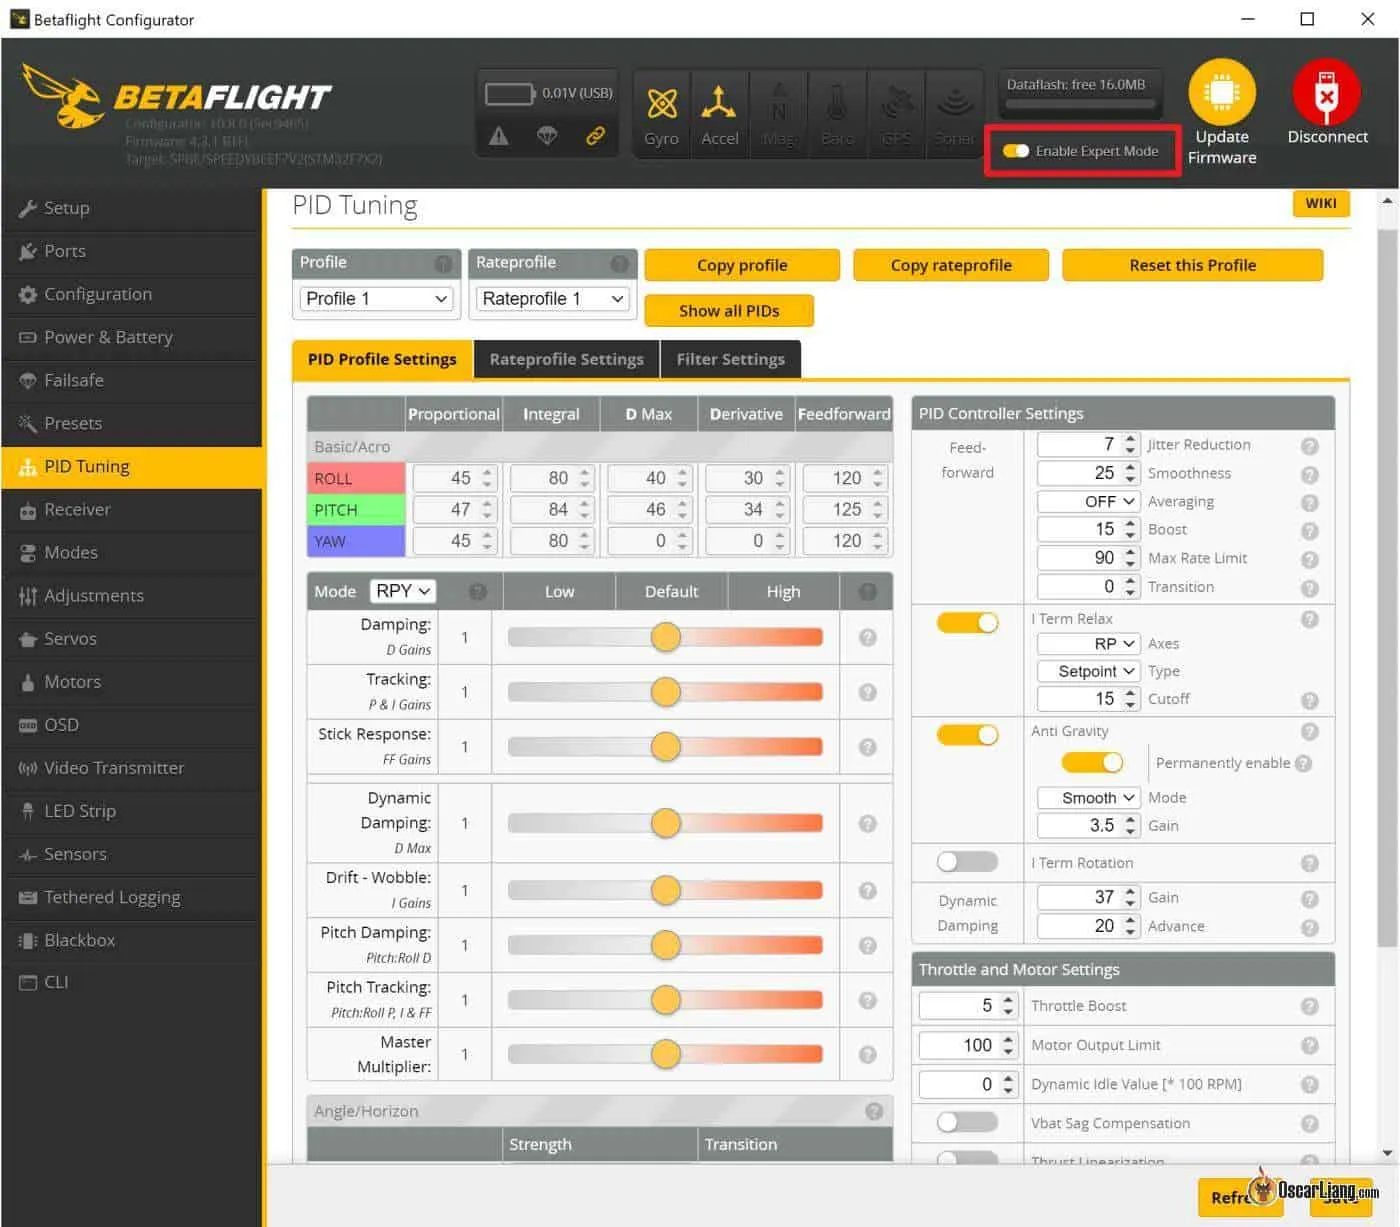
Below Stage 2, choose GPS Rescue. Now, in case your drone enters failsafe, it’ll set off GPS Rescue Mode.

So, what precisely is failsafe, and what are stage 1 and stage 2? Right here’s a fast rundown: Your drone enters failsafe upon dropping radio sign. By default, it might simply drop to the bottom, however with Rescue Mode, it’ll try and return residence.
Throughout a failsafe, your drone will first enter Stage 1, pausing briefly (guard time) to see if the sign returns. If not, it progresses to Stage 2, activating Rescue mode to deliver the quad again.
Whereas setting GPS Rescue as your failsafe technique is helpful, it’s not suited to all environments. For example, it’s not advisable in bando, forests, stadiums, or indoors. Dropping management below a tree or inside a constructing might consequence within the drone crashing into obstacles when Rescue mode engages.
You probably have no GPS lock when it failsafes, the quad will (ought to) simply drop to the bottom.
What Occurs after Rescue Mode is Activated?
Watch GPS Rescue Mode in motion right here:
Rescue mode entails 5 phases:
- Self Degree: The drone allows Angle Mode and self degree.
- Ascend: The drone climbs to a user-configured altitude.
- Rotate: It turns in direction of the house route.
- Fly Dwelling: The drone begins its journey again to the launch level. The flight won’t be a clean cruise, because the drone would possibly pitch forth and again making an attempt to regulate its velocity.
- Descend: As soon as close to the launch level, it begins descending slowly. The descent may be uneven, with the motors making pulsating sounds because the drone tries to decelerate.
- Land: Upon touching the bottom, the drone routinely disarms, with motors terminating primarily based on impression, not primarily based on altitude.
Learn how to Cease Rescue Mode
If Rescue mode was activated by way of a change, regaining full management is so simple as disengaging that change.
If activated by failsafe:
- If it’s an actual failsafe triggered by a loss radio hyperlink, the pilot should transfer the sticks greater than 30% to regain management after radio hyperlink comes again.
- If the failsafe was triggered manually by way of a change, merely disengage the failsafe change — no must wiggle the sticks.
GPS Rescue Settings Defined
Settings for GPS Rescue mode can be found within the Failsafe tab.

You need to tweak the GPS Rescue settings in Betaflight to your particular setup and atmosphere. I extremely suggest visiting the Betaflight wiki to know a full understanding of what every parameter entails: https://github.com/betaflight/betaflight/pull/11579. The default settings provide a strong start line, particularly for five″ freestyle drones.
Right here, I’ll stroll you thru the settings, sharing the values I take advantage of on my 5″ freestyle drone and the reasoning behind every alternative.
Accessing all settings is easy by way of CLI—simply enter get gps_rescue for a complete checklist of GPS-related parameters. Nevertheless, adjusting them within the GUI (Failsafe tab) tends to be extra user-friendly.
Altitude Mode: It determines the altitude at which the quad returns residence.
- Most altitude is the best altitude your quad is flown throughout that flight
- Mounted altitude is only a predefined worth
- Present altitude is no matter top that the quad is at when GPS rescue mode is activated
Your best option varies with every flight’s context and atmosphere. Most altitude generally is a secure choice, nevertheless it’s not all the time the best choice. For example, in case you was diving a mountain in that flight, you might be losing vitality climbing again to the max altitude when Rescue mode is activated. When flying over ocean the place there’s no obstructions, mounted altitude may very well be a great choice. Use frequent sense, be adaptive to the totally different atmosphere and missions.
Preliminary Climb (meters): The space the quad will climb to this top above the present altitude, when a rescue is initiated and the altitude mode is about to Present Altitude. Additionally added when in Max Altitude Mode.
Return Altitude (meters): Solely applies in Mounted Altitude mode. This determines the drone’s return altitude relative to its takeoff level. It ought to be excessive sufficient to clear any obstacles like bushes and buildings however not so excessive that it excessively consumes battery throughout ascent. For my flying spots, which options tall bushes and small hills, I’ve bumped this as much as 50 meters.
Ascend/Descend Charge (meters/second): These charges rely in your atmosphere, climate, and quad’s energy. For my 5″ setup, the defaults ought to work properly. If utilizing Li-ion packs or low C-rating LiPo, take into account a decrease ascend price.
Return floor velocity (meters/second): That is the velocity at which the quad travels throughout Rescue. The default 5m/s is 18km/h which I discover means too gradual for many drones, I usually double that to 12m/s (43km/h) for micro drones, or 17m/s (60km/h) for five″ and seven″ drones. The quad’s journey route could be extra correct and replace quicker in greater velocity (within the absence of a compass). Don’t set it to decrease than 2m/s or orientation gained’t work. Word when coming into this worth in GUI, the unit is totally different than CLI (which is cm/s).
Most Pitch Angle: This setting caps the drone’s tilt angle. A better angle results in extra aggressive returns and better velocity. Perhaps helpful for heavier, excessive drag and low authority drones. In windy circumstances, a better angle may be needed for sustaining velocity, particularly for smaller quads. Nevertheless, with an excessively steep angle the drone might lose altitude and crash. Uncertain of what to set? Beginning with the default worth of 40 levels is a secure guess—it’s labored properly for my 4inch and 5inch setup.
Descend Distance (meters): That is the distance from residence our drone begins to descend. I stick to the default right here.
Throttle minimal, Throttle most, Throttle hover – these are the min, max and hover throttle values you need to use throughout Rescue mode. Set most so the quad isn’t too quick/jerky (it ought to be above your hover level), set min to maintain the props spinning at an affordable price (it ought to be decrease than your hover level). I left Throttle Min/Max at default.
To set Throttle Hover, that you must decide an correct worth. Take a look at fly your quad and see at what throttle it hovers (simply sufficient throttle to maintain the quad afloat). Use the “Throttle %” OSD aspect to get the precise worth as a substitute of simply guessing. Ideas, the best worth ought to trigger the quad to climb a bit whereas in degree mode, if the hover worth is about too low, the quad will drop early within the rescue – probably into the water! And the hover throttle worth goes to be barely totally different will depend on battery voltage, so that you would possibly surprise, what throttle worth ought to I take advantage of? Effectively you bought to ask your self, at what battery voltage you might be most certainly going to get a failsafe? It’s bought to be when the drone is the fartherest from you proper? And you might be in all probability simply earlier than half means by way of the battery, round 3.8V to three.9V. So use the hover throttle worth at this voltage.
Minimal Distance to Dwelling (meters): If Rescue begins too near residence (inside this minimal distance), the drone will fly away on its present heading till this distance from residence, and begin the conventional Rescue behaviour. I depart this on the default 15 meters.
Minimal Satellites: A minimal of 8 satellites ensures dependable Rescue mode operation. In the event you take off earlier than the GPS attain the minimal quantity of satellites, it gained’t know the precise residence location. Extra satellites imply higher accuracy. I depart this on the default, 8.
Permit Arming With out Repair: This selection offers flexibility by permitting arming and not using a GPS lock. I allow this for the comfort of take a look at flights, however make sure you get a GPS lock for while you intend to make use of GPS Rescue Mode.
Beware that GPS Rescue WILL NOT work for that flight in case you arm earlier than getting a satellite tv for pc lock (as a result of it doesn’t know the house place).
You probably have bother getting these many sats (or it takes a very long time), try my tutorial on learn how to enhance your GPS receiver efficiency. Get a brand new GPS in case you should, they solely value $15, an amazing funding for safeguarding your $300 quad!
Sanity Checks: When set to “ON”, it screens GPS Rescue mode circumstances, for instance:
- Is the GPS nonetheless related to the FC?
- Are we getting a great variety of satellite tv for pc locks?
- Are we not less than 20 meters away from residence?
- Are we getting nearer to the house, and we didn’t hit an impediment?
If any of those circumstances are usually not met, it’ll abort rescue mode and your quad will simply disarm and drop to the bottom. So yea, it’s not best in case you are flying over unrecoverable locations like ocean or mountains, however typically, it ought to be on for security causes.
The Betaflight wiki additionally recommends setting Sanity Checks to “Failsafe Solely” in case you are having bother with the choice “On” throughout testing. It turns Sanity Checks off when Rescue mode is activated by a change however solely turns it on when it’s in failsafe. That is additionally my most popular choice.
It’s dangerous to show off Sanity Verify totally, you would possibly get an indefinite flyaway. In Betaflight 4.4, there may be now a restrict of 20s of sanity failure even when all sanity checks are off. It’s a security factor. By no means fly with all sanity checks off.
Learn how to Manually Activate GPS Rescue?
Moreover failsafe, you will have the choice to manually set off GPS Rescue by flipping a change in your radio transmitter. This characteristic is useful throughout emergencies, akin to dropping your means or encountering points together with your FPV system, permitting your drone to autonomously return residence.
Go to the Modes tab in Betaflight Configurator and assign an AUX channel particularly for GPS Rescue Mode. In the event you’re new to configuring modes, try my tutorial right here: https://oscarliang.com/betaflight-modes/

Throttle Channel Fallback
Throughout Stage 1 of a failsafe, your drone goes into channel fallback, that means every radio channel is about to predefined values. It’s sensible to evaluate these values to make sure security.
By default, the Channel Fallback for Throttle is about to “Auto,” which reduces the throttle to zero, leads to the motors stopping momentarily through the guard time. This interruption might destabilize the drone earlier than GPS Rescue kicks in, probably failing a sanity examine and inflicting the drone to drop to the bottom.
One resolution is to regulate the Throttle Channel Fallback from “Auto” to “Maintain,” sustaining the final throttle worth all through the guard time, stopping motor stalling.
Nevertheless, I personally desire setting the throttle to the hover worth, in addition to centering all roll/pitch/yaw channels (set them to 1500 or auto), and prompts the change for Angle mode. This fashion, the quad ranges itself out when failsafe occurs, earlier than GPS Rescue engages.
Keep in mind, by no means set throttle to zero throughout Stage 1 of failsafe!

Learn how to Take a look at GPS Rescue
Testing GPS Rescue is an important step earlier than counting on it in real-world situations. Right here’s my strategy to making sure it really works as anticipated.
The Setup
First, assign a change in your radio to GPS Rescue to verify it might probably certainly deliver your drone residence. Ought to something not go in line with plan, flicking the change off ought to instantly return management to you.
Subsequent, allocate one other change to Failsafe within the Modes tab. This simulates a full failsafe occasion, identical to dropping RC sign, however in a a lot safer method since you possibly can exit the mode each time needed utilizing the change. It’s vital to notice that this setup is strictly for testing functions. When you’re completed, bear in mind to take away Failsafe within the Modes tab.

With the propellers eliminated, head to the Modes tab and be certain that activating the Failsafe change certainly triggers Rescue mode, throughout which your radio sticks can be momentarily locked out. Confirm in case you can exit failsafe mode and regain management easily.
Whereas bench testing with a USB connection, the Rescue mode indicator won’t illuminate as different flight modes do. Nevertheless, so long as the small yellow bar bar strikes into the activation zone, it’s working appropriately.
Incorporating GPS-related data into your OSD is helpful, offering insights into the drone’s standing. The Flight Mode indicator is especially useful, displaying “RESC” when in Rescue mode, “Air” in price mode, and “Angle” in angle mode.

Area Testing
For an precise take a look at, select an open space free from obstacles and other people, with comfortable grass. Guarantee you will have a sound residence level earlier than taking off – ideally the OSD ought to present not less than 8 satellites or extra.
Take off and fly 50-100 meters away, near the bottom, then set off Failsafe mode utilizing the change. The quad ought to promptly change to GPS Rescue mode, indicated by flight mode within the OSD because it modifications from AIR to RSC.
Take note of the house arrow within the OSD; when it’s pointing up, means you’re heading residence, when pointing down means you’re flying away. Initially, the arrow would possibly level within the flawed route in case you are not utilizing a magnetometer, which is regular because it takes 5 to 10 seconds for Betaflight to work out which route it’s heading—simply make sure the drone isn’t flying the exact opposite route after 10 seconds.
You may stop failsafe mode at any time by flipping the change, regaining full management instantly.
In the event you select to not disengage, the drone will proceed flying again to the launch level. Upon arrival, it’ll hover briefly earlier than beginning a gradual descent, throughout which the motors could pulsate, till it safely lands and disarms routinely.
Chances are you’ll need to repeat this course of a couple of instances, till you’re assured within the system’s reliability. After thorough testing, don’t overlook to take away Failsafe from the Modes tab.
Ideas and Troubleshooting
Finest Locations to Mount GPS Module
Ensuring your GPS module’s ceramic patch antenna has an unobstructed view of the sky is essential for fast and dependable satellite tv for pc lock-on. Something masking it, notably conductive supplies like carbon fiber, electrical wires, or steel, can considerably weaken the GPS sign.
Avoiding EMI
Electromagnetic interference (EMI) from different electrical parts in your quad can even have an effect on GPS efficiency. Notable sources of RF interference embody HD cameras and video transmitters. To mitigate this, mount your GPS as far-off from these units as potential.
Correct Mounting Orientation
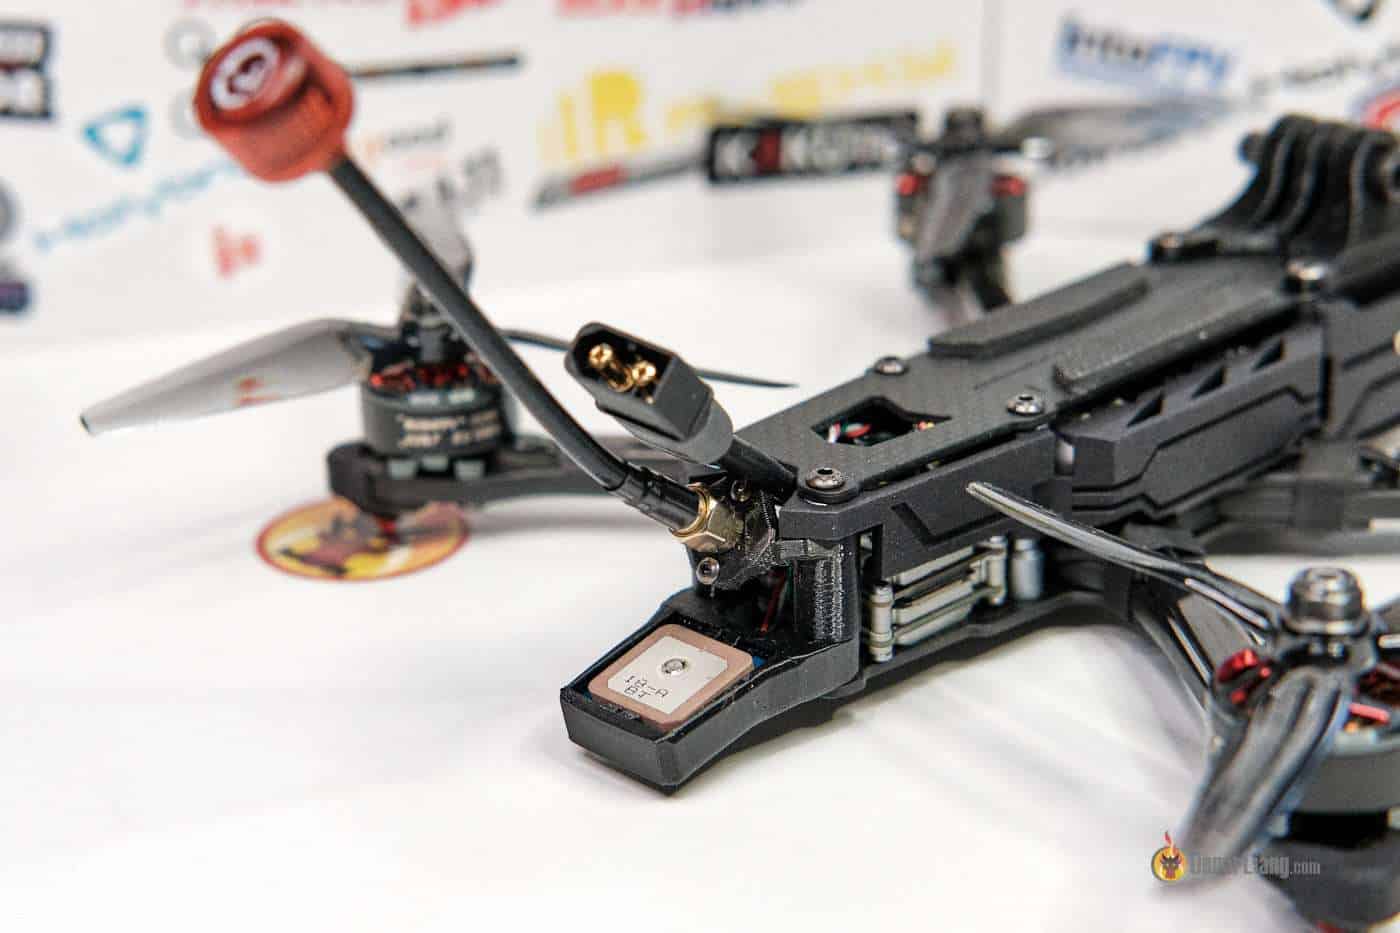
A typical error is mounting the GPS the other way up. The receiver antenna, identifiable by its flat sq. form with a small steel round half within the middle, ought to all the time face upwards. Guarantee no parts hinder this facet. Within the following picture for instance, the ceramic antenna is going through up.

The place to Mount GPS
Listed here are the concerns when mounting your GPS on a quad:
- Tthere’s nothing blocking the GPS unit
- The ceramic antenna is pointing to the sky
- Ideally suited mounting spots embody the highest of your quad, far-off from VTX and RX antennas
- Stay away from potential radiation sources like HD cameras that may lack correct EMI shielding
Listed here are a couple of mounting concepts:

On high of your GoPro/HD digicam.

On high of the body if utilizing an under-slung battery setup.

On a mast to raise the GPS away from the quad. Nevertheless, be cautious of proximity to VTX antennas.

One in all my favorite methods is to put in the GPS on the battery strap.

Getting a GPS Lock Sooner
Most GPS modules characteristic a small battery to retailer satellite tv for pc information and time, aiding quicker lock-on. As soon as the GPS has locked onto satellites, it retains their positions for fast reconnection after battery modifications. In case your GPS constantly takes lengthy to lock, examine if its battery is depleted utilizing a multimeter. Reduce interference as a lot as potential—as an illustration, by relocating a strong VTX, particularly in case you’re on a 1.3GHz FPV setup. Climate circumstances like cloudy days can even impression GPS sign high quality.
For extra tips about optimizing BN220 for elevated satellite tv for pc locks, try my devoted tutorial: https://oscarliang.com/gps-settings-u-center/
Options instantly from Betaflight Builders
I like to recommend 10 satellites. [And] Await 30s after [you have] 10 satellites for altitude to stabilise [before taking off].
All the time affirm regular GPS Rescue behaviour at first of a crucial flight by testing with the failsafe change. Set the change to instantly enter Stage 2. You may enter and depart GPS Rescue by way of the change with quick on and off impact. Verify that the quad rotates and flies in direction of residence and does the best issues earlier than you might be so far-off {that a} true failsafe could happen.
ALWAYS CHECK that the Dwelling Arrow factors instantly again in direction of residence after takeoff! Typically, in case you take off and spin round throughout arming or instantly on takeoff, the quad’s angle data can turn into corrupted, and the Dwelling Arrow can level the flawed means. It’s finest to arm cleanly and fly away from Dwelling in a straight line at an affordable velocity instantly after takeoff. Watch the Dwelling Arrow rigorously to make sure it rapidly factors again to Dwelling. If the Dwelling Arrow factors the flawed means when a failsafe happens, the GPS Rescue will initially fly off within the flawed route, and in some instances, you might lose the quad.
Improper Course in Rescue Mode?
With no compass, rescue mode ought to nonetheless work because the quads calculate route by way of GPS information comparability.
Firstly, your quad may be wandering round and even flying in direction of the flawed route however finally it ought to self-correct. With weak GPS connection, it might probably take longer to appropriate.
In case you are utilizing a compass and it’s flying the flawed route, then perhaps there’s one thing flawed with the compass, or perhaps it’s not calibrated correctly. On this case attempt turning off magnetometer in Betaflight and take a look at once more. If it really works now, it proves your compass is the supply of the issue.
In case your yaw is jerky throughout Rescue mode, your GPS may be updating too slowly (e.g. 1Hz), attempt to enhance it to 5Hz and even 10Hz following this information (solely works on sure GPS modules).
Checking GPS Accuracy (HDOP/PDOP)
HDOP and PDOP are measurements of how correct your GPS is. Decrease values imply higher accuracy. In INAV they use HDOP and in Betaflight 4.5, they use PDOP.
HDOP (Horizontal Dilution of Precision) and PDOP (Place Dilution of Precision) are each measures of GPS accuracy, however they deal with totally different features. HDOP primarily displays the accuracy of horizontal place (longitude and latitude), whereas PDOP considers the accuracy of each horizontal and vertical positioning (latitude, longitude, and altitude).
You may show PDOP in Betaflight OSD by coming into set osd_gps_sats_show_hdop = ON within the CLI. Here’s what the worth means:
- 1.0 to 1.5: Wonderful accuracy, very secure GPS lock.
- 1.5 to 2.0: Acceptable, minor drifting would possibly happen.
- 2.0 to three.0+: Poor accuracy, vital place drift is frequent.
Extra satellites usually decrease your PDOP/HDOP, bettering GPS accuracy. Digital interference, particularly from units like GoPro cameras or Wi-Fi, can negatively have an effect on PDOP/HDOP and trigger instability in GPS maintain mode.
Keep away from Softserial
Keep away from utilizing Softserial for GPS Rescue because it’s too gradual. Chances are you’ll use it to show GPS associated data on the OSD, nevertheless it’s merely not dependable sufficient for GPS Rescue. It’s finest to make use of a {hardware} serial port (any TX and RX pins on the FC), and set baudrate to not less than 57600.
Not Getting GPS Lock
Interference out of your quad’s electronics, such because the VTX, telemetry-equipped radio receivers, and even wires carrying vital present, can hinder your GPS’s potential to lock onto satellites. In the event you’re going through difficulties reaching a GPS lock, take into account the next steps:
- Energy the Flight Controller (FC) by way of USB to examine if it powers the GPS module. If not, transfer the GPS module’s energy connection to a unique pad on the FC that will get energy from the USB port.
- Isolate the FC’s Energy Provide: Powering solely the FC with out the VTX will help you get a faster GPS lock. However, it’s advisable to mount your GPS so far as potential from each the VTX and RX antennas to attenuate potential interference.
- Shielding Electrical Wires: shielding wires that conduct vital present can mitigate interference. These wires can act like antennas, probably disrupting GPS alerts.
GPS satellites function on two frequencies, L1 1575.42MHz and L2 1227.60MHz. Consequently, a 1.3GHz FPV setup would possibly intervene together with your GPS. Nearly all of pilots use 5.8GHz, which typically avoids this drawback. Nevertheless, given the weak GPS sign—originating from satellites in house—even sturdy close by alerts may cause interference. Thus, positioning the GPS module away from any transmission sources is essential.
Operating GPS wires below the VTX may cause points, notably if the VTX lacks sufficient RF shielding. This RF noise can compromise GPS performance. For instance, the Avatar VTX V1 was recognized to trigger GPS issues when wires are routed beneath it. A possible repair entails grounding the VTX’s shielding. Alternatively, shielding the wires between the GPS and FC—and guaranteeing they’re grounded—would possibly provide an answer.

I attempted to protect wires with foil in one among my builds, then related the foil to a floor pad on the FC. After wrapping it with fabric tape to stop short-circuiting the body, I observed minimal enchancment. Whereas some have reported optimistic outcomes with this modification, it’s value exploring if different simple options are unavailable.
Didn’t Activate GPS After Updating Betaflight
In the event you’re unable to allow GPS after flashing the most recent Betaflight model, it’s potential that some options together with GPS have been excluded from the compiled firmware – a brand new characteristic referred to as Cloud Construct System.
To confirm if that is the issue, enter the next command within the CLI:
characteristic gps
Ought to the CLI reply with “gps not obtainable,” it signifies that the GPS performance was not included in your FC’s Betaflight firmware. To resolve this, you’ll must reflash your FC. This time, be certain that the GPS choice is chosen within the Cloud Construct system throughout compilation: https://oscarliang.com/flash-update-betaflight/#Cloud-Construct-System
Understanding GPS Coordinates Precision
When displaying GPS coordinates within the OSD, you’re supplied with choices to decide on the variety of decimal locations proven—presently, solely 4 and seven decimal choices can be found. This choice instantly influences how precisely you possibly can pinpoint a location on a map primarily based on the GPS information.
The “Decimal Levels” Wikipedia web page offers an in depth desk evaluating diploma precision to bodily distance:
decimal
locations   levels          distance
-------  -------          --------
0        1                111  km
1        0.1              11.1 km
2        0.01             1.11 km
3        0.001            111  m
4        0.0001           11.1 m
5        0.00001          1.11 m
6        0.000001         11.1 cm
7        0.0000001        1.11 cm
8        0.00000001       1.11 mm
It’s essential to distinguish between accuracy and precision on this context. The GPS could show a excessive diploma of precision (variety of digits), however not all decimal locations could mirror true accuracy. Which means that whereas your GPS can report coordinates to a really advantageous decision, the precise accuracy—how shut these coordinates are to the actual location—could range.
Edit Historical past
- Oct 2018: Tutorial creation.
- Aug 2020: Updates for GUI and CLI parameter modifications, addition of throttle settings.
- Feb 2023: BF4.4 replace with auto-landing characteristic.
- Mar 2024: BF4.5 replace.
- Apr 2025: up to date