Troubleshooting a big, advanced, distributed enterprise utility includes challenges like tracing requests throughout a number of providers, figuring out efficiency bottlenecks throughout the stack, and understanding cascading failures between dependent providers. Clients typically must work with remoted knowledge to determine the underlying reason for the issue. By correlating completely different alerts like logs, traces, metrics, and different efficiency indicators, you will get helpful perception into what prompted the issue, the place, and why.
Amazon OpenSearch Service is a managed service to deploy, function, and search knowledge at scale inside AWS. Amazon Managed Grafana is a safe knowledge visualization service to question operational knowledge from a number of sources, together with OpenSearch Service.
On this put up, we present you the best way to use these providers to correlate the assorted observability alerts that enhance root trigger evaluation, thereby leading to decreased Imply Time to Decision (MTTR). We additionally present a reference answer that can be utilized at scale for proactive monitoring of enterprise functions to keep away from an issue earlier than they happen.
Resolution overview
The next diagram exhibits the answer structure for gathering and correlating varied enterprise telemetry alerts at scale.

On the core of this structure are functions composed of microservices (represented by orange packing containers) working on Amazon Elastic Kubernetes Service (Amazon EKS). These microservices comprise instrumentation that emit telemetry knowledge within the type of metrics, logs, and traces. This knowledge is exported into the OpenTelemetry Collector, which serves as a central vendor agnostic gateway to gather this knowledge uniformly.
On this put up, we use an OpenTelemetry demo utility as a pattern enterprise utility. Massive enterprise clients usually separate their observability sign knowledge into varied shops for scalability, fault isolation, entry management, and ease of operation. To help in these capabilities, we suggest and use Amazon OpenSearch Ingestion for a serverless, scalable, and absolutely managed knowledge pipeline. We separate log and hint knowledge and ship them to distinct OpenSearch Service domains. The answer additionally sends the metrics knowledge to Amazon Managed Service for Prometheus.
We use Amazon Managed Grafana as a knowledge visualization and analytics platform to question and visualize this knowledge. We additionally present the best way to make use of correlations as a helpful instrument to realize insights from these alerts unfold throughout varied knowledge shops.
The next sections define constructing this structure at scale.
Conditions
Full the next prerequisite steps:
- Provision and configure the Amazon Managed Prometheus workspace to obtain metrics from the OpenTelemetry Collector.
- Create two devoted OpenSearch Service domains (or use present ones) to ingest logs and traces from the OpenTelemetry Collector.
- Create an Amazon Managed Grafana workspace and configure knowledge sources to connect with Amazon Managed Prometheus and OpenSearch Service.
- Arrange an EKS cluster to deploy functions and the OpenTelemetry Collector.
Create log and hint OpenSearch Ingestion pipelines
Earlier than establishing the ingestion pipelines, you could create the mandatory AWS Id and Entry Administration (IAM) insurance policies and roles. This course of includes creating two insurance policies for area and OSIS entry, adopted by making a pipeline position that makes use of these insurance policies.
Create a coverage for ingestion
Full the next steps to create an IAM coverage:
- Open the IAM console.
- Select Insurance policies within the navigation pane, then select Create coverage.
- On the JSON tab, enter the next coverage into the editor:
{
    "Model": "2012-10-17",
    "Assertion": [
        {
            "Effect": "Allow",
            "Action": "es:DescribeDomain",
            "Resource": "arn:aws:es:*:{accountId}:domain/*"
        },
        {
            "Effect": "Allow",
            "Action": [ "es:ESHttpGet", "es:HttpHead", "es:HttpDelete", "es:HttpPatch", "es:HttpPost", "es:HttpPut" ],
            "Useful resource": "arn:aws:es:us-east-1:{accountId}:area/otel-traces"
        },
        {
            "Impact": "Permit",
            "Motion": [ "es:ESHttpGet", "es:HttpHead", "es:HttpDelete", "es:HttpPatch", "es:HttpPost", "es:HttpPut" ],
            "Useful resource": "arn:aws:es:us-east-1:{accountId}:area/otel-logs"
        }
        }
    ]
}

// Substitute {accountId} with your individual values- Select Subsequent, select Subsequent once more, and identify your coverage domain-policy.
- Select Create coverage.
- Create one other coverage with the identify osis-policy and use the next JSON:
{
    "Model": "2012-10-17",
    "Assertion": [
        {
            "Effect": "Allow",
            "Action": "osis:Ingest",
            "Resource": "arn:aws:osis:us-east-1:{accountId}:pipeline/osi-pipeline-otellogs"
        },
        {
            "Effect": "Allow",
            "Action": "osis:Ingest",
            "Resource": "arn:aws:osis:us-east-1:{accountId}:pipeline/osi-pipeline-oteltraces"
        }
    ]
}
// Substitute {accountId} with your individual values
Create a pipeline position
Full the next steps to create a pipeline position:
- On the IAM console, select Roles within the navigation pane, then select Create position.
- Choose Customized belief coverage and enter the next coverage into the editor:
{
    "Model": "2012-10-17",
    "Assertion": [
        {
            "Effect": "Allow",
            "Principal": {
                "Service": [
                    "eks.amazonaws.com",
                    "osis-pipelines.amazonaws.com"
                ],
                "AWS": "{nodegroup_arn}"
            },
            "Motion": "sts:AssumeRole"
        }
    ]
}

// Substitute {nodegroup_arn} with your individual values- Select Subsequent, then seek for and choose the insurance policies
osis-policyanddomain-policyyou simply created. - Select Subsequent and identify the position
PipelineRole. - Select Create position.
Permit entry for the pipeline position in OpenSearch Service domains
To allow entry for the pipeline position in OpenSearch Service domains, full the next steps:
- Open the OpenSearch Service console.
- Select your area (both logs or traces).
- Select the OpenSearch Dashboards URL
- Register along with your credentials.
Then, full the next steps for every OpenSearch Service area (logs and traces domains).
- In OpenSearch Dashboards, go to the Safety
- Select Roles after which all_access.
This process makes use of the all_access position for demonstration functions solely. This grants full administrative privileges to the pipeline position, which violates the precept of least privilege and will pose safety dangers. For manufacturing environments, you must create a customized position with minimal permissions required for knowledge ingestion, restrict permissions to particular indexes and operations, take into account implementing index patterns and time-based entry controls, and frequently audit position mappings and permissions. For detailed steering on creating customized roles with acceptable permissions, check with Safety in Amazon OpenSearch Service.
- Select Mapped customers after which Managed mapping.
- On the Map person web page, beneath Backend roles, replace the backend position with the Amazon Useful resource Identify (ARN) for the position
PiplelineRole. - Select Map.

Create a pipeline for logs
Full the next steps to create a pipeline for logs:
- Open the OpenSearch Service console.
- Select Ingestion pipelines.
- Select Create pipeline.
- Outline the pipeline configuration by coming into the next:
model: "2"
otel-logs-pipeline:
  supply:
    otel_logs_source:
      path: "/v1/logs"
  sink:
    - opensearch:
        hosts: ["{OpenSearch_domain_endpoint}"]
        aws:
          sts_role_arn: "arn:aws:iam::{accountId}:position/osi-pipeline-role"
          area: "us-east-1"
          serverless: false
        index: "observability-otel-logs%{yyyy-MM-dd}"

 # To get the values for the placeholders:
 # 1. {OpenSearch_domain_endpoint}: You will discover the area endpoint by navigating to the Amazon Managed Opensearch managed clusters within the AWS Administration Console, after which clicking on the area.
 # After acquiring the mandatory values, change the placeholders within the configuration with the precise values.
Create a pipeline for traces
Full the next steps to create a pipeline for traces:
- Open the OpenSearch Service console.
- Select Ingestion pipelines.
- Select Create pipeline.
- Outline the pipeline configuration by coming into the next:
model: "2"
entry-pipeline:
  supply:
    otel_trace_source:
      path: "/v1/traces"
  processor:
    - trace_peer_forwarder:
  sink:
    - pipeline:
        identify: "span-pipeline"
    - pipeline:
        identify: "service-map-pipeline"
span-pipeline:
  supply:
    pipeline:
      identify: "entry-pipeline"
  processor:
    - otel_traces:
  sink:
    - opensearch:
        index_type: "trace-analytics-raw"
        hosts: ["{OpenSearch_domain_endpoint}"]
        aws:
          sts_role_arn: "arn:aws:iam::{accountId}:position/osi-pipeline-role"
          area: "us-east-1"
service-map-pipeline:
  supply:
    pipeline:
      identify: "entry-pipeline"
  processor:
    - service_map:
  sink:
    - opensearch:
        index_type: "trace-analytics-service-map"
        hosts: ["{OpenSearch_domain_endpoint}"]
        aws:
          sts_role_arn: "arn:aws:iam::{accountId}:position/osi-pipeline-role"
          area: "us-east-1"

 # To get the values for the placeholders:
 # 1. {OpenSearch_domain_endpoint}: You will discover the area endpoint by navigating to the Amazon Managed Opensearch managed clusters within the AWS Administration Console, after which clicking on the area.  # 2. {accountId}: That is your AWS account ID. You will discover your account ID by clicking in your username within the top-right nook of the AWS Administration Console and deciding on "My Account" from the dropdown menu.
 # After acquiring the mandatory values, change the placeholders within the configuration with the precise values.
Set up the OpenTelemetry demo utility in Amazon EKS
Use the EKS cluster you arrange earlier together with AWS CloudShell or one other instrument to finish these steps:
- Open the AWS Administration Console.
- Select the CloudShell icon within the prime navigation bar, or go on to the CloudShell console.
- Watch for the shell surroundings to initialize—it comes preinstalled with widespread AWS Command Line Interface (AWS CLI) instruments.
Now you possibly can full the next steps to put in the appliance.
- Clone the OpenTelemetry Demo repository:
git clone https://github.com/aws-samples/sample-correlation-opensearch-repository- Navigate to the Kubernetes listing:
cd deployment_files- Deploy the demo utility utilizing kubectl apply:
kubectl apply -f .- Use a load balancer to show the frontend service so you possibly can attain the supply utility internet URL:
kubectl expose deployment opentelemetry-demo-frontendproxy --type=LoadBalancer --name=frontendproxy- After you’ve gotten deployed the appliance, entry the frontend utility utilizing the load balancer on port 8080. Use your browser to go to http://
:8080/ to open the supply utility for OpenTelemetry.

By following these steps, you possibly can efficiently set up and entry demo functions in your EKS cluster.
Configure the OpenTelemetry Collector exporter for logs, traces, and metrics
The OpenTelemetry Collector is a instrument that manages the receiving, processing, and exporting of telemetry knowledge out of your utility to a goal repository.
On this step, we ship logs and traces to OpenSearch Service and metrics to Amazon Managed Prometheus. The OpenTelemetry Collector additionally works with fashionable knowledge repositories like Jaeger and quite a lot of different open supply and business platforms. On this part, we embrace steps to configure the OpenTelemetry Collector in an EKS surroundings. Then we deploy the demo utility and discover the OpenTelemetry exporters utilizing AWS Managed Options as an alternative of the open supply variations.
Full the next steps:
- Open the otel-collector-config ConfigMap in your most well-liked editor:
kubectl edit configmap opentelemetry-demo-otelcol -n otel-demo- Replace the exporters part with the next configuration (present the suitable Amazon Managed Service for Prometheus endpoint and OpenSearch Service log ingestion URLs):
exporters:
     logging: {}
     otlphttp/logs:
       logs_endpoint: "/v1/logs"
       auth:
         authenticator: sigv4auth
       compression: none
     otlphttp/traces:
       traces_endpoint: "/v1/traces"
       auth:
         authenticator: sigv4auth
       compression: none
     prometheusremotewrite:
        endpoint: ""
        auth:
authenticator: sigv4auth - Find the extensions part and replace the IAM position ARN within the sigv4auth configuration:
sigv4auth:
        assume_role:
            arn: "arn:aws:iam::{accountId}:position/osi-pipeline-role"
            sts_region: "us-east-1"
        area: "us-east-1"
        service: "osis"
# {accountId}: change accountID along with your account id- After updating the ConfigMap, restart the OpenTelemetry Collector deployment:
kubectl rollout restart deployment opentelemetry-demo-otelcol -n otel-demoWith these modifications, the OpenTelemetry Collector will ship hint knowledge to the OpenSearch Service area, metrics knowledge to the AWS Managed Service for Prometheus endpoint, and log knowledge to the OpenSearch Service area.
Configure Amazon Managed Grafana
Earlier than you possibly can visualize your logs and traces, you could configure OpenSearch Service as a knowledge supply in your Amazon Managed Grafana workspace. This configuration is completed by way of the Amazon Managed Grafana console.
Configure the OpenSearch Service knowledge supply
Full the next steps to configure the OpenSearch Service knowledge supply:
- Open the Amazon Managed Grafana console.
- Choose your workspace and select the workspace URL to entry your Grafana occasion.
- Log in to your Amazon Managed Grafana occasion.
- From the aspect menu, select the configuration (gear) icon.
- On the Configuration menu, select Knowledge Sources.
- Select Add knowledge supply.
- On the Add knowledge supply web page, choose OpenSearch Service from the record of accessible knowledge sources.
- Within the Identify area, enter a descriptive identify for the info supply.
- Within the URL area, enter the URL (OpenSearch Service area endpoint) of your OpenSearch Service area, together with the protocol and port quantity.
- In case your OpenSearch cluster is configured with authentication, present the required credentials within the Person and Password
- If you wish to use a selected index sample for the info supply, you possibly can specify it within the Index identify area (For instance,
logstash-*). - Alter some other settings as wanted, such because the Time area identify and Time interval.
- Select Save & Take a look at to confirm the connection to your OpenSearch cluster.
If the take a look at is profitable, you must see a inexperienced notification with the message “Knowledge supply is working.”
- Select Save to save lots of the info supply configuration.
- Repeat the identical steps for the OpenSearch logs and traces domains.
Configure the Prometheus knowledge supply
Full the next steps to configure the Prometheus knowledge supply:
- Open the Amazon Managed Grafana console.
- Choose your workspace and select the workspace URL to entry your Grafana occasion.
- Log in to your Amazon Managed Grafana occasion.
- From the aspect menu, select the configuration (gear) icon.
- On the Configuration menu, select Knowledge Sources.
- Select Add knowledge supply.
- On the Add knowledge supply web page, choose Amazon Managed Prometheus from the record of accessible knowledge sources.
- Within the Identify area, enter a descriptive identify for the info supply.
- The AWS Auth Supplier and Default Area fields needs to be routinely populated primarily based in your Amazon Managed Grafana workspace configuration.
- Within the Workspace area, enter the ID or alias of your Amazon Managed Prometheus workspace.
- Select Save & Take a look at to confirm the connection to your Amazon Managed Prometheus workspace.
If the take a look at is profitable, you must see a inexperienced notification with the message “Knowledge supply is working.”
- Select Save to save lots of the info supply configuration.
Create correlations in Amazon Managed Grafana
To determine connections between your logs and traces knowledge, you could arrange knowledge correlations in Amazon Managed Grafana. This lets you navigate seamlessly between associated logs and traces. Observe these steps in your Amazon Managed Grafana workspace:
- Open the Amazon Managed Grafana console.
- Choose your workspace and select the workspace URL to entry your Grafana occasion.
- Within the Amazon Managed Grafana portal, on the Administration menu, select Plugins and Knowledge, and select Correlation.

- On the Arrange the goal for the correlation web page, beneath Goal, select your traces knowledge supply (OpenSearch Service, for instance,
otel-traces) from the dropdown record and outline the question that may execute when the hyperlink is adopted. You should use variables to question particular area values. For instance,traceId: ${__value.uncooked}.

- On the Arrange the goal for the correlation web page, select the log knowledge supply from the dropdown record, and enter the sector identify to be linked or correlated with the traces knowledge supply within the OpenSearch Service knowledge supply. For instance,
traceID.

- Select Save to finish the correlation configuration.

- Repeat the steps to create a correlation between metrics on Prometheus to logs in OpenSearch Service.

Validate outcomes
In Amazon Managed Grafana, utilizing the Prometheus knowledge supply, find the specified occasion for correlation. The occasion ID can be displayed as a hyperlink. Observe the hyperlink to open the corresponding log particulars in a panel on the appropriate aspect of the web page.

With the logs to traces correlation configured, you possibly can entry hint data straight from the logs web page. Select traces on the log particulars panel to view the corresponding hint knowledge.

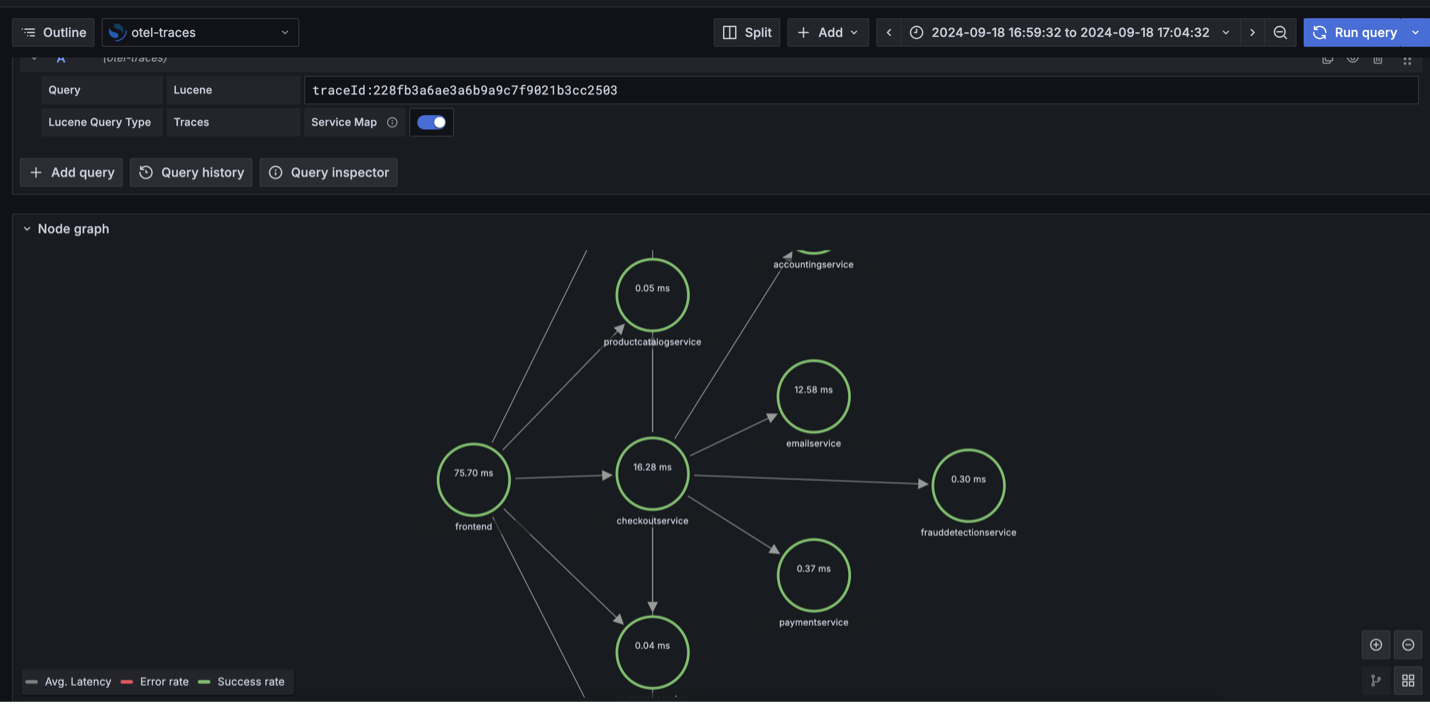
The next screenshot demonstrates the node graph visualization exhibiting the correlation stream: occasion metrics to logs to traces.
Clear up
Take away the infrastructure for this answer when not in use to keep away from incurring pointless prices.
Conclusion
On this put up, we confirmed the best way to use correlation as a useful instrument to realize perception into observability knowledge saved in varied shops.
Separating logs and traces into devoted domains offers the next advantages:
- Higher useful resource allocation and scaling primarily based on completely different workload patterns
- Unbiased efficiency optimization for every knowledge sort
- Simplified value monitoring and administration
- Enhanced safety management with separate entry insurance policies
You should use this answer as a reference to construct a scalable observability answer in your enterprise to detect, examine, and remediate issues quicker. This skill, when used alongside next-generation synthetic intelligence and machine studying (AI/ML), helps to not solely proactively react however predict and stop issues earlier than they happen. You’ll be able to be taught extra about AI/ML with AWS.
In regards to the Authors
 Balaji Mohan is a Senior Supply Marketing consultant specializing in utility and knowledge modernization to the cloud. His business-first method offers seamless transitions, aligning expertise with organizational targets. Utilizing cloud-centered architectures, he delivers scalable, agile, and cost-effective options, driving innovation and development.
 Senthil Ramasamy is a Senior Database Marketing consultant at Amazon Net Providers. He works with AWS clients to supply steering and technical help on database providers, serving to them with database migrations to the AWS Cloud and bettering the worth of their options when utilizing AWS.
 Muthu Pitchaimani is a Search Specialist with Amazon OpenSearch Service. He builds large-scale search functions and options. Muthu is within the matters of networking and safety, and relies out of Austin, Texas.