As information analytics workloads scale, organizations face two challenges. First, they need to ship high-performance analytics at large scale whereas sustaining safe entry throughout numerous instruments. Second, they need to handle high-concurrency workloads whereas integrating with current id administration methods.
You may handle these challenges by utilizing Amazon Redshift Serverless endpoints behind an AWS Community Load Balancer with Microsoft Entra ID federation. This structure can authenticate whereas serving to to streamline id administration throughout your information surroundings. Amazon Redshift Serverless gives petabyte-scale analytics with auto scaling capabilities, enabling high-concurrency workloads whereas streamlining consumer authentication and authorization.
On this submit, we present you configure a local id supplier (IdP) federation for Amazon Redshift Serverless utilizing Community Load Balancer. You’ll discover ways to allow safe connections from instruments like DBeaver and Energy BI whereas sustaining your enterprise safety requirements.
Resolution overview
The next diagram reveals the structure.
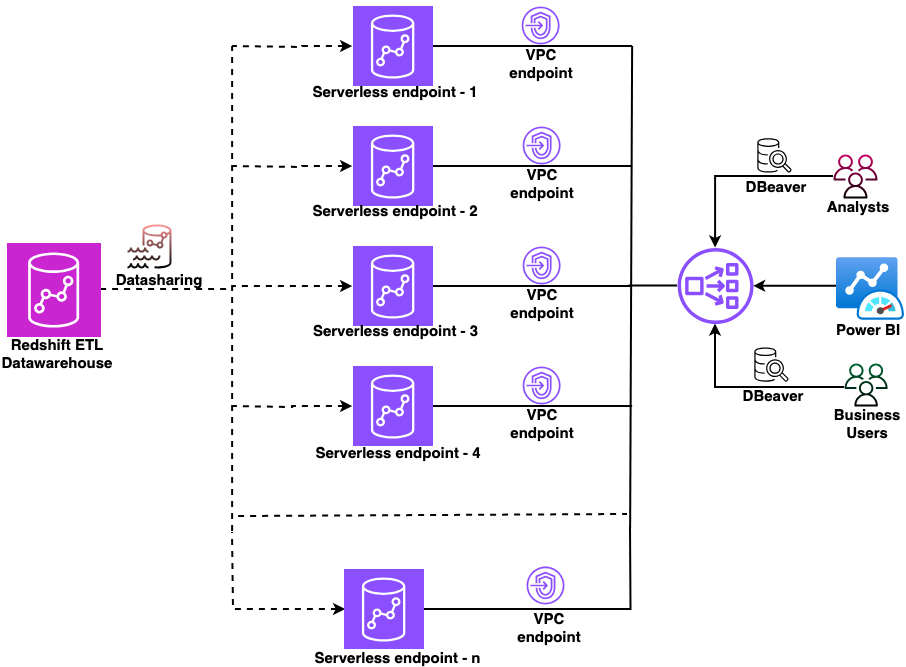
Determine 1: Pattern structure diagram
On this structure:
- A central Amazon Redshift ETL information warehouse shares information to a number of Amazon Redshift Serverless workgroups utilizing Amazon Redshift information sharing.
- Every workgroup has a devoted managed Amazon Digital Personal Cloud (Amazon VPC) endpoint.
- A Community Load Balancer sits in entrance of all VPC endpoints, offering a single connection level.
- Customers join from DBeaver or Energy BI via the Community Load Balancer and authenticate utilizing their Microsoft Entra ID credentials.
This setup works whether or not you’re validating the idea with a single workgroup at present or planning to scale to a number of workgroups sooner or later.
Stipulations
Earlier than you start, just remember to have accomplished these conditions.
- Create Amazon Redshift Serverless endpoints.
- Arrange datashare from producer to Amazon Redshift Serverless endpoints.
- Create Amazon Redshift-managed VPC endpoints.
- Create a Community Load Balancer.
- Configure a website title.
- Arrange Amazon Redshift native IdP federation with Microsoft Entra ID.
- Collect the next out of your registered utility in Microsoft Entra ID:
- Scope (API-Scope)
- Azure Shopper ID (AppID from App Registration Particulars)
- IdP Tenant (Tenant ID from App Registration Particulars)
- Obtain and set up the newest Amazon Redshift JDBC and ODBC drivers.
This answer makes use of the next AWS providers.
Implementation steps
This part covers configuring the Community Load Balancer, establishing an ACM certificates, creating customized domains in Amazon Redshift, configuring DNS data in Amazon Route 53, and connecting your JDBC and ODBC purchasers utilizing Microsoft Entra ID authentication.
1. Configure the Community Load Balancer
First, acquire the personal IP addresses on your Amazon Redshift-managed VPC endpoints:
- Open the Amazon Redshift Serverless console.
- Select your workgroup.
- Notice the personal IP handle of your Redshift-managed VPC endpoint.
- Repeat for every Amazon Redshift Serverless endpoint that you just wish to add to the Community Load Balancer.
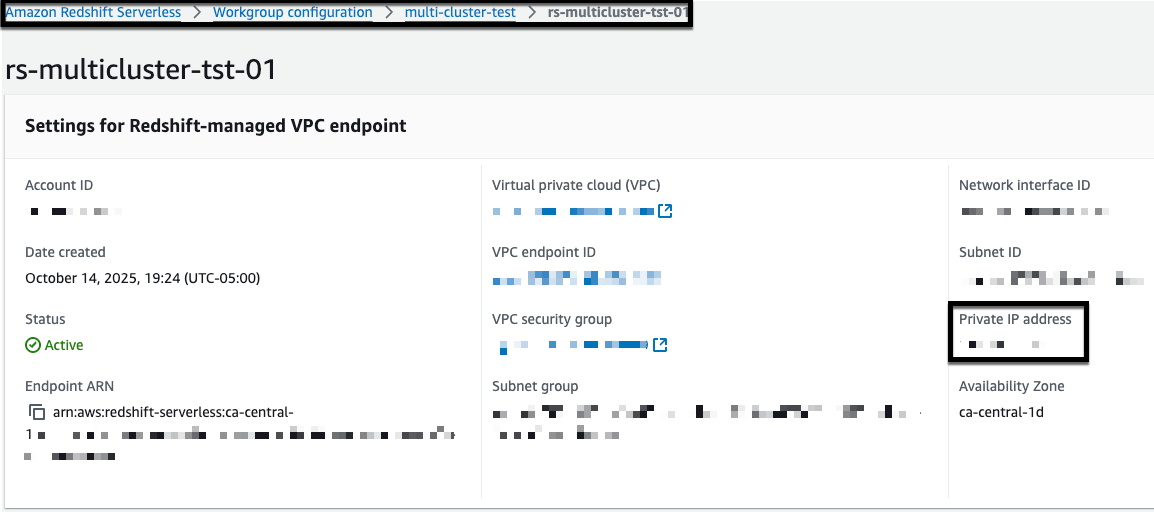
Determine 2: Amazon Redshift managed VPC endpoint
Subsequent, create a goal group on your endpoints:
- Open the Amazon Elastic Compute Cloud (Amazon EC2) console.
- Select Goal Teams.
- Select Create goal group.
- Configure the goal group:
- For Goal kind, select IP addresses.
- For Goal group title, enter rs-multicluster-tg.
- For Protocol, select TCP.
- For Port, enter 5439 (Notice: You’ll find your particular port quantity within the Redshift endpoint connection particulars. Should you haven’t modified it, use the default port 5439.).
- For VPC, choose your VPC.
- Select Subsequent.

Determine 3: create goal group in NLB
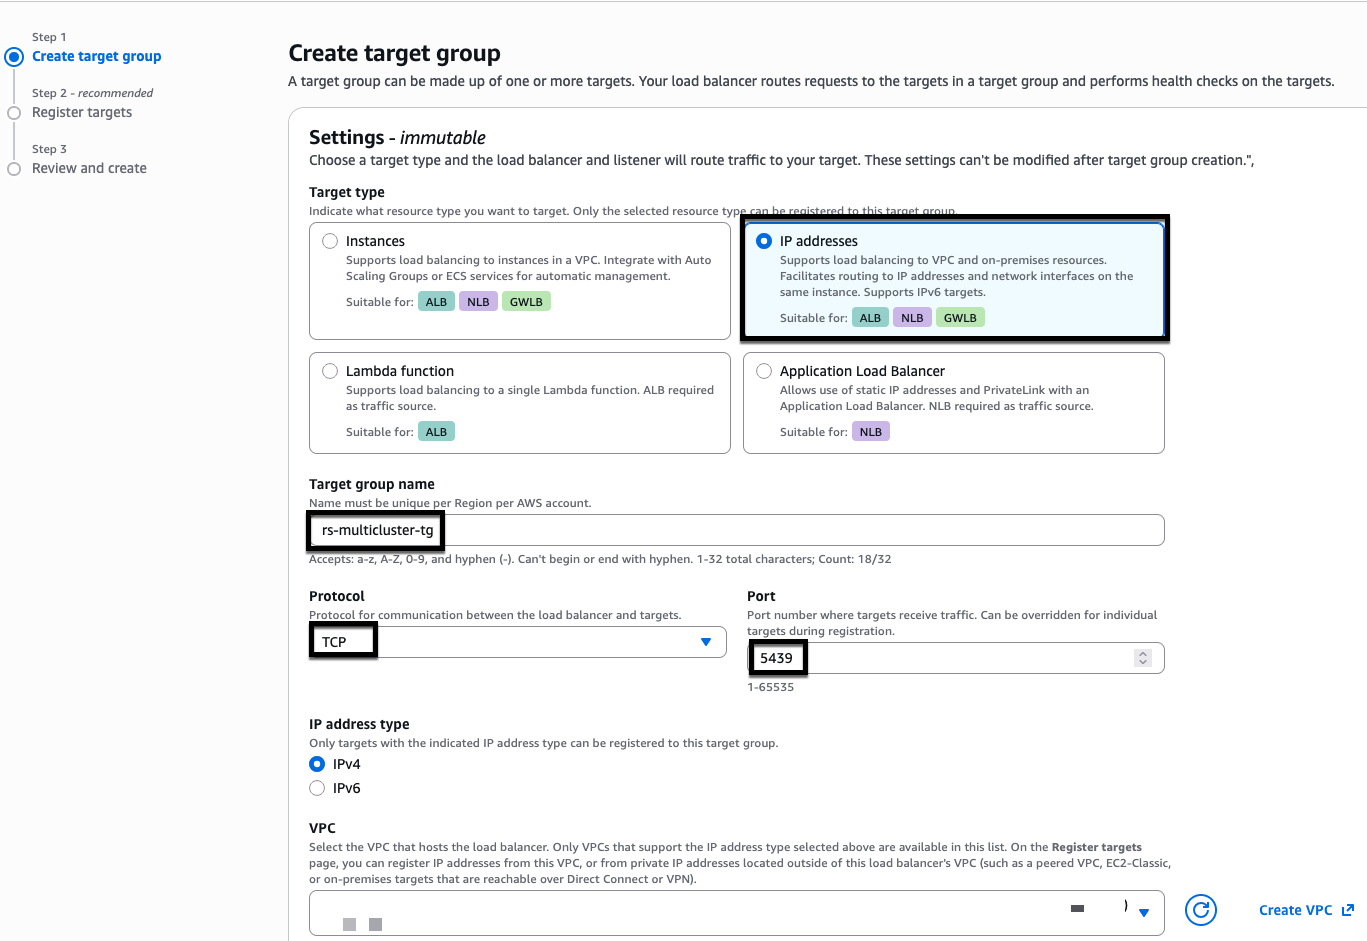
Determine 4: NLB goal group creation
Add a listener to your Community Load Balancer:
- Within the EC2 console, select Load Balancers.
- Choose your Community Load Balancer.
- Within the Listeners tab, select Add listener.
- Configure the listener:
- For Protocol, select TCP.
- For Port, enter 5439.
- For Default motion, select
rs-multicluster-tg.
- Select Add listener.
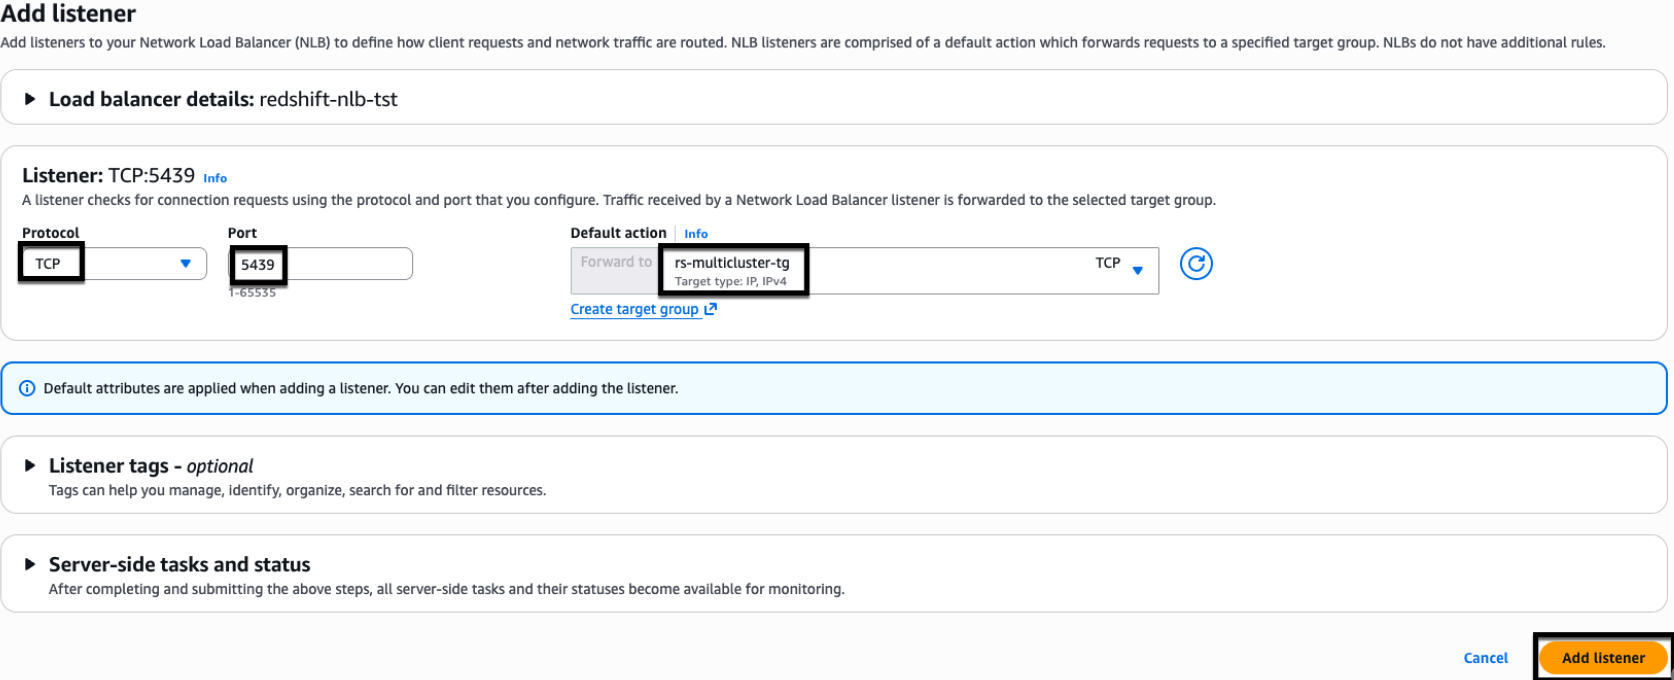
Determine 5: NLB listener properties.
2. Configure AWS Certificates Supervisor (ACM)
For this instance, we use myexampledomain.com as a customized area. Change it with your personal area title earlier than you start.Comply with these steps to request and configure your certificates:
- Request a certificates in AWS Certificates Supervisor (ACM):
- Open the AWS Certificates Supervisor console.
- Select Request Certificates.
- Select Request Public certificates.
- Select Subsequent.
- Configure the certificates:
- Add two domains:
- Community Load Balancer CNAME:
dev-redshift.myexampledomain.com - Wildcard area:
*.redshift.myexampledomain.com
- Community Load Balancer CNAME:
- For Validation technique, select DNS validation.
- Select Request.
For enhanced safety, we suggest including particular person Amazon Redshift Serverless CNAMEs as an alternative of utilizing wildcards (*). This instance makes use of DNS validation in AWS Certificates Supervisor, which requires creating CNAME data to show area management.
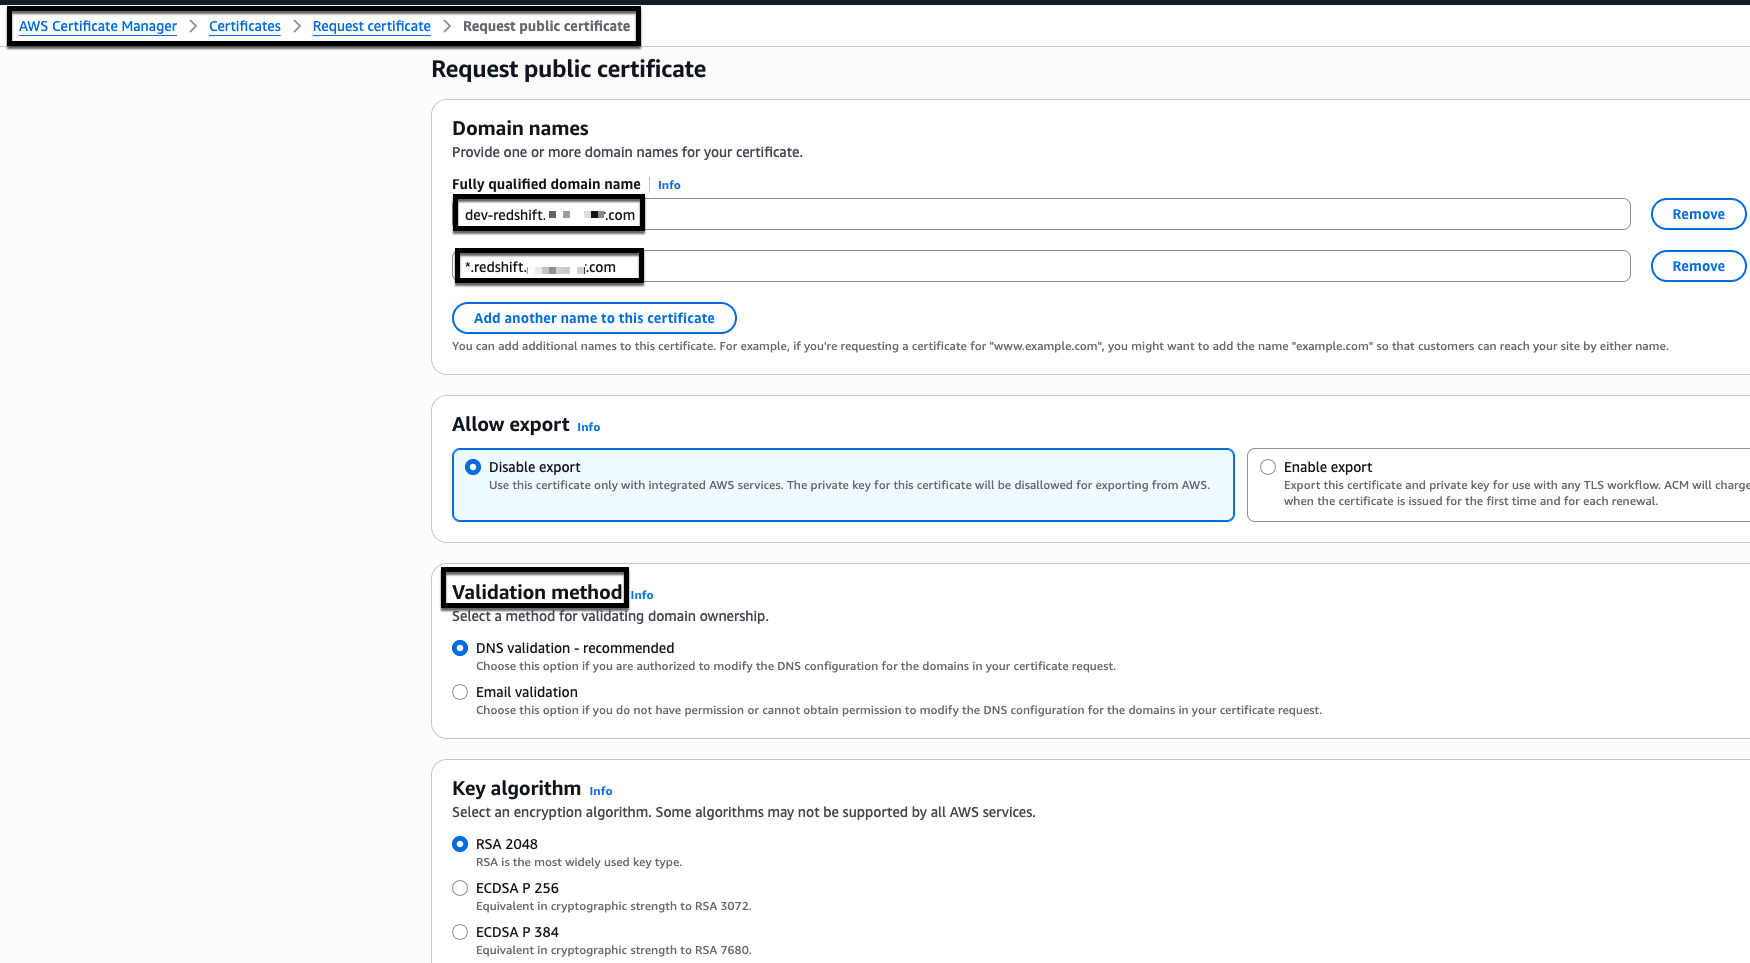
Determine 6: AWS Certificates Supervisor (ACM) certificates creation
- Add two domains:
- Validate the certificates:
- Your AWS Certificates Supervisor (ACM) certificates initially reveals a ‘Pending validation’ standing.
- Look forward to the standing to vary to ‘Issued’ earlier than continuing.
- You need to have an ‘Issued’ standing earlier than creating Amazon Redshift customized domains.

Determine 7: Pattern issued AWS Certificates Supervisor (ACM) certificates
3. Configure Amazon Redshift customized domains
- Create a customized area title:
- Open the Amazon Redshift Serverless console.
- Choose your workgroup.
- From Actions, select Create customized area title.
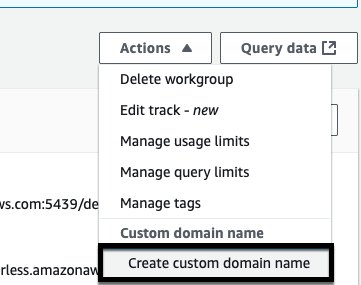
Determine 8: Amazon Redshift customized area title creation
- Configure the area settings:
- For Customized area title, enter
cluster-02.redshift.myexampledomain.com. - For ACM certificates, choose the certificates you created for
dev-redshift.myexampledomain.com. - Select Create.
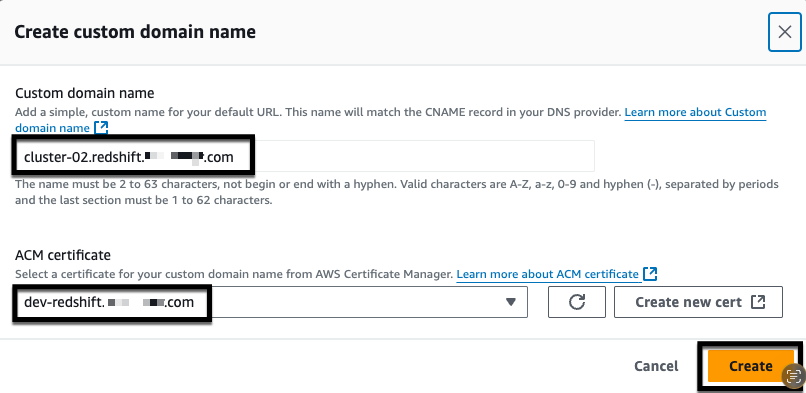
Determine 9: Amazon Redshift customized area title creation
- For Customized area title, enter
- Confirm that the customized area title seems in your workgroup.

Determine 10: Amazon Redshift customized area title
- Repeat steps 1–3 for every remaining Amazon Redshift Serverless endpoint that you just wish to add to the Community Load Balancer. Use a novel customized area title for every endpoint (for instance,
cluster-03.redshift.myexampledomain.com,cluster-04.redshift.myexampledomain.com) and choose the identical ACM certificates that you just created earlier.
4. Configure Amazon Route 53
Amazon Route 53 maps your customized area title to the proper Amazon Redshift endpoint, making it reachable by title reasonably than a system-generated handle. With out it, purchasers don’t have any solution to resolve your customized area and AWS Certificates Supervisor can’t confirm area possession to allow safe connections.First, create a CNAME document on your Community Load Balancer:
- Get the Community Load Balancer DNS title:
- Open the Amazon EC2 console.
- Select Load Balancers.
- Choose your Community Load Balancer.
- Copy the DNS title.
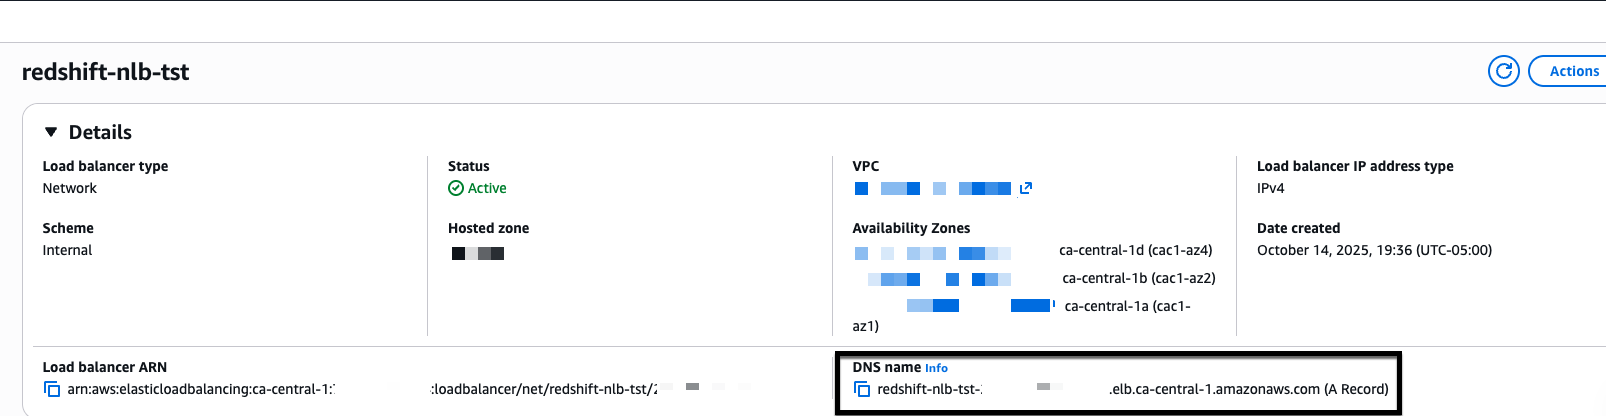
Determine 11: NLB DNS title
- Create Route 53 data:
- Open the Amazon Route 53 console.
- Select Hosted Zones.
- Choose
myexampledomain.com. - Select Create document.
- Configure the document:
- For File title, enter
dev-redshift.myexampledomain.com. - For File kind, select A – Routes site visitors to an IPv4 handle and a few AWS assets.
- For Alias, select Sure.
- For Route site visitors to, select Alias to Community Load Balancer.
- Choose your AWS Area and Community Load Balancer DNS title.
- For Routing coverage, select Easy routing.
- Select Create data.
- For File title, enter
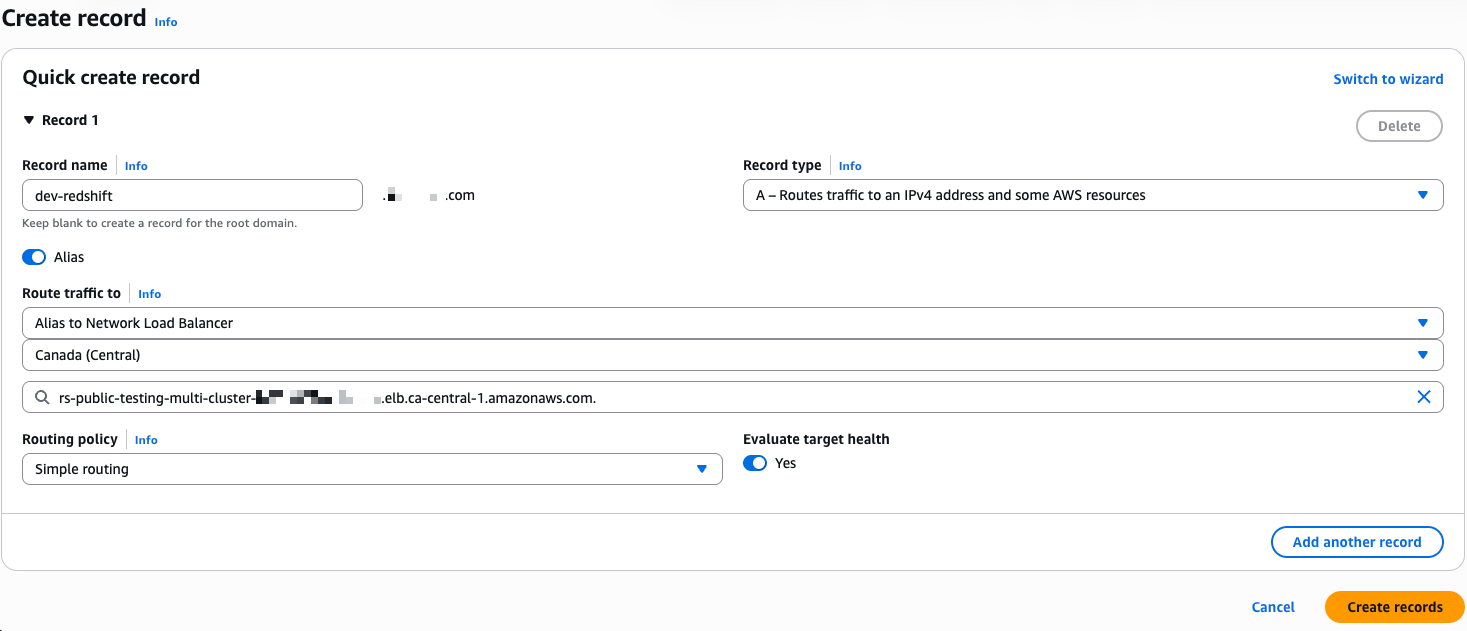
Determine 12: NLB – A document in route 53
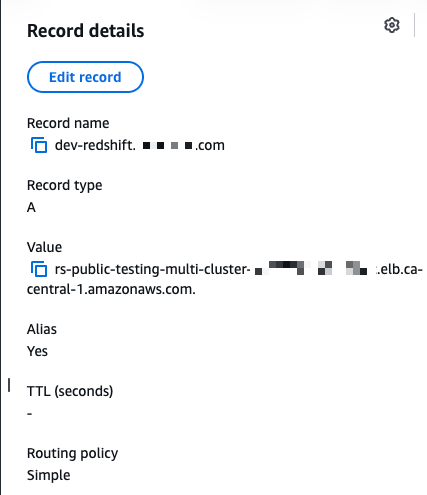
Determine 13: NLB – A document in Route 53
- Create the AWS Certificates Supervisor (ACM) validation CNAME:
- Open AWS Certificates Supervisor.
- Choose your certificates for
dev-redshift.myexampledomain.com. - Copy the CNAME title and CNAME worth.
- Return to Route 53.
- Create a CNAME document in your
myexampledomain.comhosted zone utilizing the values from AWS Certificates Supervisor (ACM). - Select Create data.

Determine 14: NLB – CNAME document in Route 53
5. Configure Amazon Redshift JDBC and ODBC drivers with native IdP
The JDBC and ODBC driver configuration connects your shopper functions to Amazon Redshift via the Community Load Balancer utilizing your Microsoft Entra ID credentials for authentication. Configuring each drivers permits any instrument, whether or not DBeaver utilizing JDBC or Energy BI utilizing ODBC, to authenticate via the identical id supplier and attain the proper Amazon Redshift endpoint via a single connection level.
JDBC driver setup in DBeaver
- Create a brand new Amazon Redshift connection:
- Host:
dev-redshift.myexampledomain.com(NLB CNAME). - Database:
dev. - Authentication: Database Native.
- Username:
login id for a consumer account.
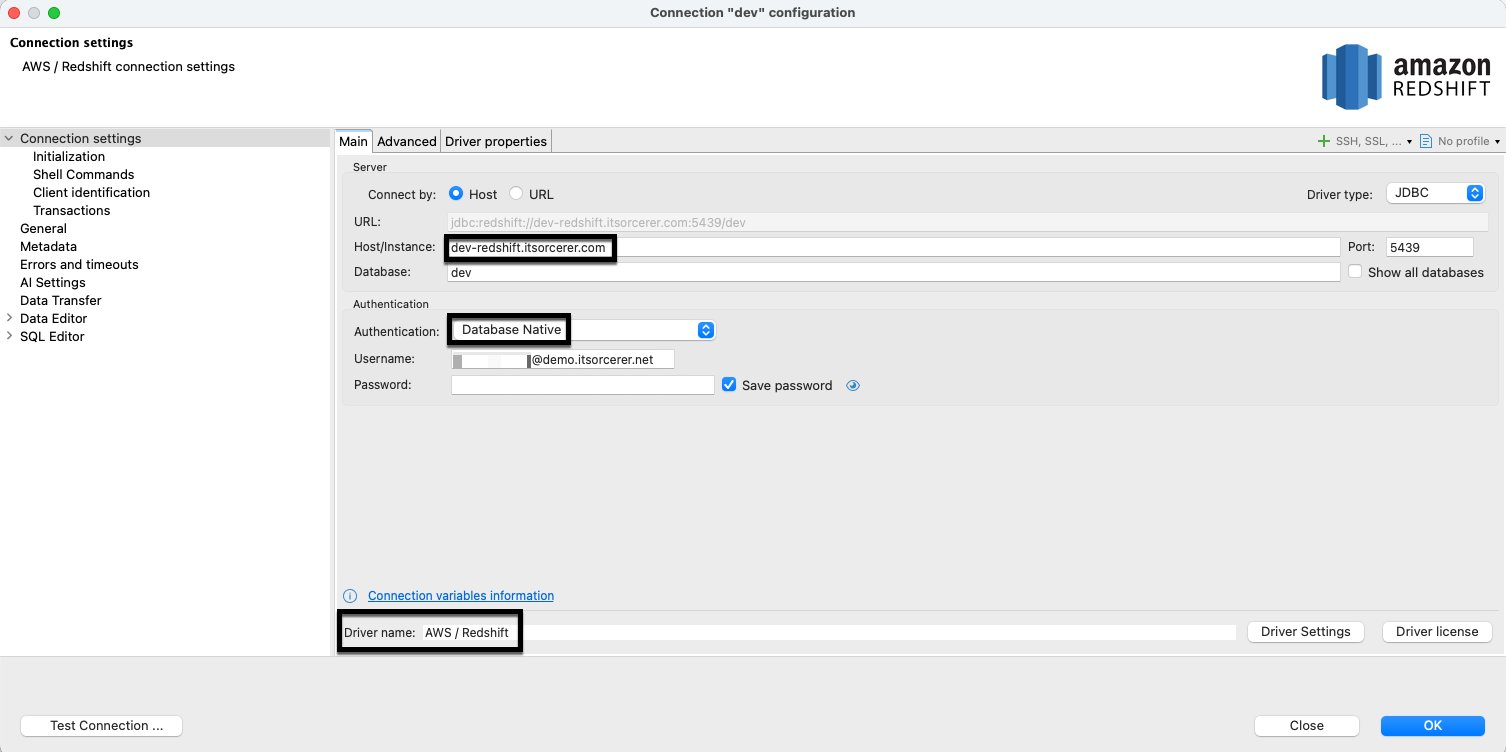
Determine 15: Amazon Redshift JDBC driver setup
- Host:
- Configure driver properties:
- plugin_name:
com.amazon.redshift.plugin.BrowserAzureOAuth2CredentialsProvider. - sslmode:
verify-ca.
- plugin_name:
- Add consumer driver properties:
- client_id: [Your Microsoft Entra ID application client ID].
- idp_tenant: [Your Microsoft Entra ID tenant].
- listen_port:
7890. - loginTimeout:
60. - scope: [Your Microsoft Entra ID application scope].
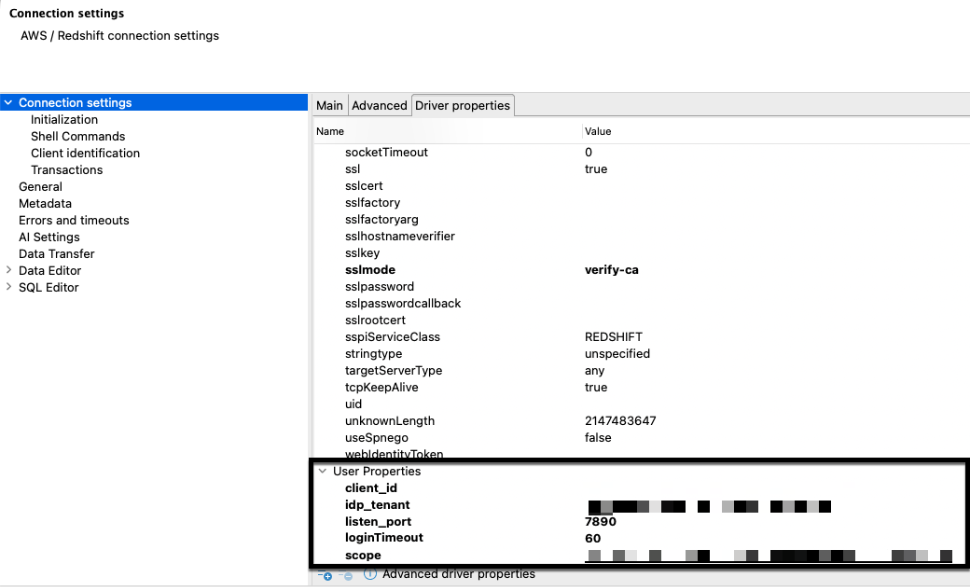
Determine 16: Amazon Redshift JDBC driver consumer properties
ODBC driver setup
- Configure the system DSN:
- Open ODBC Information Supply Administrator (64-bit).
- Select System DSN.
- Select Add.
- Choose Amazon Redshift ODBC Driver (x64) 2.01.04.00.
- Select End.
- Configure connection settings:
- Information Supply Identify:
dev-redshift. - Server:
dev-redshift.myexampledomain.com. - Port:
5439. - Database:
dev. - Auth kind: Identification Supplier: Browser Azure AD OAUTH2.
- Scope: [Your Microsoft Entra ID application scope].
- Azure Shopper ID: [Your Microsoft Entra ID application client ID].
- IdP Tenant: [Your Microsoft Entra ID application tenant].

Determine 17: Amazon Redshift ODBC driver properties
- Information Supply Identify:
- Configure SSL settings:
- SSL Mode:
verify-ca. - Select Save.
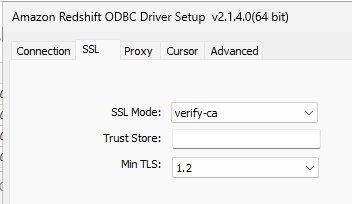
Determine 18: Amazon Redshift ODBC driver properties
- SSL Mode:
6. Validate connectivity
Take a look at DBeaver connection
- After configuring the JDBC driver properties, select Take a look at Connection.
- Authenticate via the Microsoft login in your browser.
- Confirm that you just obtain a hit message.
- Verify profitable connection utilizing Native IdP via the Community Load Balancer.
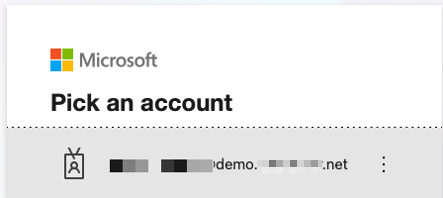
Determine 19: Microsoft Entra id authentication

Determine 20: Profitable Microsoft Entra id authentication
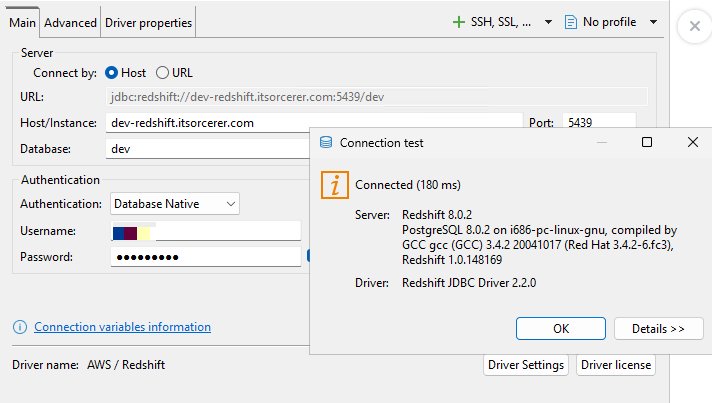
Determine 21: Profitable Amazon Redshift authentication
Take a look at energy BI desktop connection
- Launch Energy BI Desktop:
- Select Get information.
- Select Extra.
- Beneath Different, choose ODBC.
- Select Join.
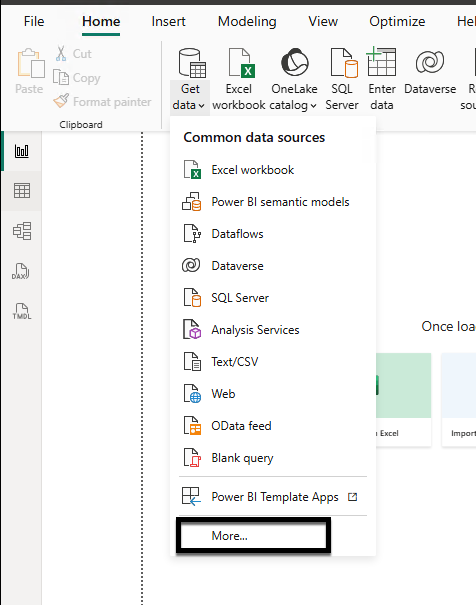
Determine 22: Energy BI desktop connectivity utilizing Amazon Redshift ODBC driver
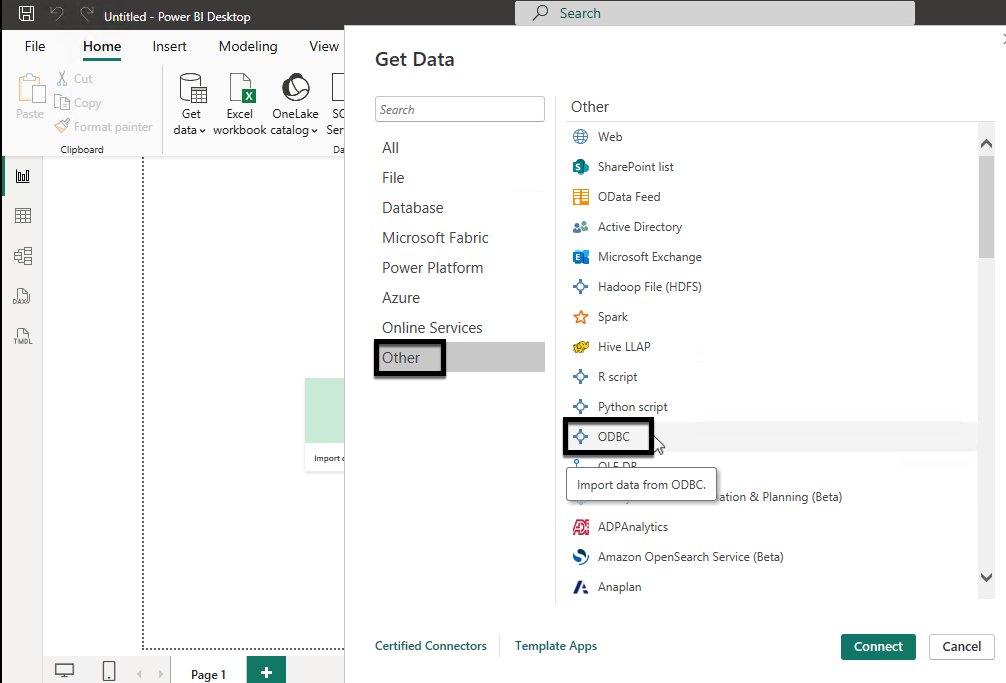
Determine 23: Energy BI desktop connectivity utilizing Amazon Redshift ODBC driver
- Configure the connection:
- Choose
dev-redshiftfrom the Information supply title. - Select OK.
- Full Microsoft Entra ID authentication in your browser.
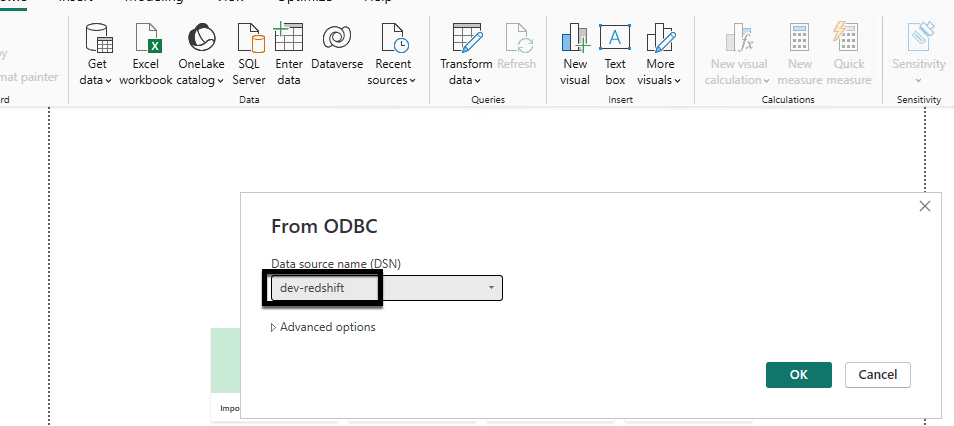
Determine 24: Energy bi desktop connectivity utilizing Amazon Redshift odbc driver

Determine 25: Profitable Microsoft Entra id authentication
- Choose
- Take a look at the connection:
- From Navigator, select schema
tpcds. - Choose
date_dim. - Select Load.
- Confirm that you may analyze your Amazon Redshift information in Energy BI Desktop.

Figure26: Energy BI desktop related to Amazon Redshift and schema shopping
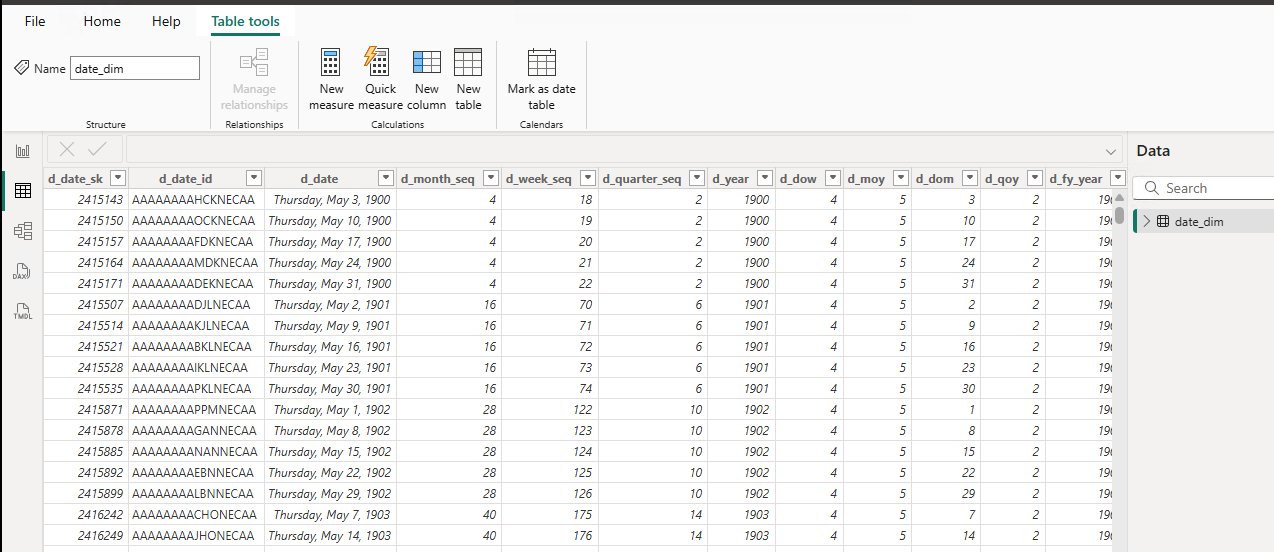
Determine 27: Energy BI desktop fetching information from date_dim desk
- From Navigator, select schema
Cleansing up
To keep away from ongoing prices, delete the next assets:
- Delete the Amazon Redshift information warehouses (provisioned cluster or serverless workgroup and namespace) and the VPC endpoints that you just created.
- Delete the certificates that you just created in AWS Certificates Supervisor (ACM).
- Delete the Community Load Balancer.
Conclusion
On this submit, we confirmed you combine Amazon Redshift Serverless with Microsoft Entra ID utilizing an AWS Community Load Balancer as a single connection endpoint throughout a number of workgroups. As your information analytics use instances develop, you’ll be able to proceed to scale horizontally by including new workgroups behind the identical Community Load Balancer with out altering your customers’ connection settings or authentication expertise.
For extra details about extending and scaling this answer, see the next assets:
AWS Blogs
Concerning the authors